Saturday, April 14, 2007

HOWTO cleanup gentoo portage distfiles, packages that are unused (eclean)

eclean can be your friend, it is a part of the gentoolkit. If you don't have the gentoolkit: emerge gentoolkit.

eclean can cleanup distribution files and packages. Because you are a regular emerge --sync, emerge --update --deep --ask world sort of person, you will likely be using disk space on all those old packages you have upgraded out of.

eclean distfiles
eclean packages


DESCRIPTION

eclean is small tool to remove obsolete portage sources files and binary packages. Used on a regular basis, it prevents your DISTDIR and PKGDIR directories to infinitely grow, while not deleting files which may still be useful.

By default, eclean will protect all distfiles or binary packages corresponding to some ebuilds available in the Portage tree. This is the safest mode, since it will protect whatever may still be useful, for instance to downgrade a package without downloading its sources for the second time, or to reinstall a package you unmerge by mistake without recompiling it. Sure, it's also a mode in which your DISTDIR and PKGDIR will stay rather big (although still not growing infinitly). For the 'distfiles', this mode is also quit slow mode because it requiries some access to the whole Portage tree.

If you use the --destructive option, eclean will only protect files corresponding to some currently installed package (taking their exact version into account). It will save much more space, while still preserving sources files around for minor revision bumps, and binaries for reinstallation of corrupted packages. But it won't keep files for less usual operations like downgrading or reinstalling an unmerged package. This is also the fastest execution mode (big difference for distfiles), and the one used by most other cleaning scripts around like yacleaner (at least in its version 0.3).

Somewhere in the middle, adding the --package-names option when using --destructive will protect files corresponding to all existing versions of installed packages. It will allow easy downgrading without recompilation or redownloading in case of trouble, but won't protect you against package uninstallation.

In addition to this main modes, some options allow to declare a few special cases file protection rules:

o
--time-limit is useful to protect files which are more recent than a given amount of time.
o
--size-limit (for distfiles only) is useful if you want to protect files bigger than a given size.
o
--fetch-restricted (for distfiles only) is useful to protect manually downloaded files. But it's also very slow (again, it's a reading of the whole Portage tree data)...
o
Finally, you can list some categories or package names to protect in exclusion files (see EXCLUSION FILES below).

Keywords:gentoo, portage, cleanup, portage cleanup, eclean, cleanup portage directory, cleanup portage storage /usr/portage/distfiles, /usr/portage/distfiles, cleanup of /usr/portage/distfiles

Sunday, April 01, 2007

VMWare with Gentoo Guest - why is fit guest now grayed out?

My configuration
HOST: Windows XP
Guest: Linux Gentoo 2006.1
VMWARE Version: VMWare Server 1.0.2 build-39867
X Windows: 7.2
Desktop Environment: KDE 3.5

I wished to fill my 1600X1400 monitor with my Gentoo VMWare image while in 'Quick switch' mode. However, the Fit Guest Now was grayed out. The reason? I needed to have vmware-user running (location for me: /usr/lib/vmware-tools/bin32/vmware-user). This is a tool in the VMWare tools. For VMWare tools installation see Install Gentoo on VMWare - VMWare Tools Section.

As soon as I launched the vmware-user, the Fit Guest Now menu becomes un-grayed and works beautifully. Enjoy your new found desktop real estate.

I've yet to have the autofit guest work, but I am happy enough that the fit guest now works. Another day for the autofitting.

Keywords: fit guest now grayed out, gentoo, vmware, linux, VMWare server, vmware-user, maximizing desktop for Gentoo Guest in VMWare, autofit guest.

VMWare with Gentoo Guest - why does copy and paste not work

My configuration
HOST: Windows XP
Guest: Linux Gentoo 2006.1
VMWARE Version: VMWare Server 1.0.2 build-39867

First off, the copy and paste is provided by VMWare Tools. VMWare Tools run under X Windows.

There are a number of articles out there describing how to do this for various flavors of VMWare; however, my experience has demonstrated that these work just fine for VMWare Server. I would worry not.

I found that with these instructions (HOWTO install Gentoo on VMWARE - installation of VMWARE Tool Section) and my original version of X11 R6.8 did not work out as well with driver module installation. Perhaps I was careless, but my solution was simply to upgrade to X Windows 7.2 - a seamless upgrade for me. Note to you: you may as well take a snapshot to allow a roll back.

I would recommend following the path of upgrading if you've not, insuring that you have in your make.conf: INPUT_DEVICES="keyboard vmmouse" VIDEO_CARDS="vmware". If you have/want to upgrade, as I did, follow these instructions: Migrating to Modular X HOWTO

After migrating to Modular X Windows 7.2 the VMWare tools launch automatically as I start X so copy and paste works seamlessly now.

Keywords: gentoo, vmware, copy and paste, vmware tools, vmware server, gentoo guest, x windows, why doesn't copy and paste work?

Sunday, March 25, 2007

The ever improving Internet, Mashups and innovations and where to find them listed

In the quest to turn the data into information, many unique ideas as quickly formed when someone integrates two or more internet APIs these days. The marketing phrase Web 2.0 has been used to describe this, but it is news to me that someone has been managing the web releases from a configuration management standpoint.

What can be done with the 'Mashup'?

  • Want to know where Tim Hibbard is? Where's Tim. (I had no idea who he is, but I know where he is) - 3/25/07 8:31 PM. I stand corrected I know a little more about who he is and I infer he has a decent sense of humor now. :-)
  • Local Ski conditions? Ski Bonk. Integrating Google Maps with ski resorts/cameras/etc.
  • Nintendo Wii finder. Wii finder. Search ebay, walmart, target, bestbuy, circuit city and overlay the locations on a google map.
  • Auctions nearby? Find Near By. Like the above, but finds items up for sale on craigslist, ebay, amazon, walmart.
  • Dig through the earth. Dig Here. Have Google maps show you where a hole thru the earth would come out.
  • Birth place of Oscar winners. Oscar Winners. From 1928 - 2006
  • Internet Domains. Domain Tools. A multitude of information about a domain name.
  • Webcams. GooCam. Google Maps integrated with found streaming web cameras.
  • Downgrade your graphics? Ascii Maps. Transform Google Maps images into Ascii
  • Blog value calculator. How much is your blog worth?

As you can tell, there is plenty of ideas -- Several useless, others are entertaining. Programmableweb is registering 3.1 mashups per day. Soon we will need to mashup the mashup listings to add value to that infinite data.

Keywords: Mashups, Web 2.0, programmable web, Web APIs, google maps mashups, technorati mashups, mashup listings.

Saturday, March 10, 2007

HOWTO tether your Blackberry Pearl (8100) to a PC using Windows XP and Cingular

One of the advantages to having a Blackberry phone is the built-in ability to connect your PC/laptop to the internet via the phone. Now the hunt for free wireless connections while traveling has been made simple. No more of the questions (and the incessant googling that ensues to know for sure): does that hotel have free wireless? does this coffee shop have free wireless? Admission of internet addiction will be prevented and you (and I) can continue to remain in denial. Using this method I was able to achieve 120 Kbps downloads/ 60Kbps uploads in the Seattle area in March of 2007. It is not broadband speed these days, but it is better than 0 Kbps.Want to do this for Linux? Go here to the Linux post.


Prerequisites:

  • The latest Software For BlackBerry Desktop Software v4.2 Service Pack 1 from Research in Motion installed. Today this is version 4.2.1.8. Download link.
  • A Blackberry Pearl (8100). This may work with others.
  • A USB cable to connect computer to Blackberry
HOWTO

Summary
You will need to have the Blackberry Device Manager running, it provides the emulated serial port. You will need to modify the modem initialization string, this was a modem added when the BlackBerry Desktop Software was installed. Lastly a dial-up connection will need to be made.

Data you will need (Cingular, now AT&T Wireless again):
Modem Initialization String: AT+CGDCONT=1,"IP","wap.cingular"
Dial-up Phone Number: *99#
Dial-up username/password:blank/blank

This web-page has an excellent step-by-step guide that you can plug in the Cingular data above
How to: Tether BlackBerry Pearl to PC for use as a modem

Enjoy.

Keywords: Tether Blackberry, Tether Blackberry Pearl, Tether Blackberry Windows XP, Tether Blackberry 8100, Tether Blackberry with Cingular, Tether Blackberry with AT and T Wireless, Dialup via Blackberry, Wireless internet through Blackberry.

Tuesday, February 20, 2007

Visual Studios 6.0 shortcut keys that matter to me

At work I end up living within Visual Studios 6.0 for long durations. These below are probably my most used short-cuts.

Failed compile?

F4 - Move to next Error (and highlight in the IDE)

Auto-Complete
ALT+SPACE

Structure members
CTRL+SPACE

View function parameters

CTRL+SHIFT+SPACE

Auto-indent current selection
ALT+F8

Callgraphs
ALT+F12

Brace Matching
Ctrl-}

Or if you want do 'know it all'

To display keyboard shortcuts

  1. From the Help menu, choose Keyboard Map and perform one or more of the following actions:
    • Click Category, Editor, Command, Keys, or Description to sort the keyboard shortcut list alphabetically in different ways.

    • Click the Printer button to print a copy of the list.

    • Click the Copy button to copy the list to the Clipboard so you can paste it into a word processor or other text editor.

    • Click the drop-down menu to filter the list to view either All Commands, Bound Commands, or by menu.

Tuesday, February 06, 2007

HOWTO turn off sticky keys in windows


I am normally not one to get riled up, but I have to admit that the number of times I've seen the above dialog makes me ready to use words I shouldn't.

We are blessed with every Windows installation having Sticky Keys ready to respond to either a rapid press of the shift key or a long pause on the shift key. If you are anything like me, I often pause in thought with a finger on the shift key. Right now I pause with my finger on the shift and wonder whose decision it was to leave this on by default in Windows? ... On a lighter note, on the name "sticky keys." Isn't that something you would get if you use your keyboard immediately after peeling an especially juicy orange?

To the get dialog above:
Hit shift 5 times
or
Hold shift down for 5 seconds.


To turn it of from the dialog above:

  1. Click Settings
  2. On Keyboard Tab, as seen the dialog below un-select use StickyKeys

  3. Careful you aren't done yet. Click the settings button in the StickyKeys area.
  4. In that dialog un-select all the items.
  5. Click OK.
  6. Click OK once more.
You are now not going to be interrupted while you are paused thinking any more.

Keywords: Windows, StickyKeys off, Turn off StickyKeys, how to Turn off StickyKeys, Stop StickyKeys dialog.

Saturday, February 03, 2007

HOWTO turn off the UPS alarm on Tripp Lite OMNI1000LCD UPS (USB)

All UPS units tend to have an alarm (also known as the beeper) that sounds when the power is removed from the unit. This alarm maybe valuable to some people, but I would say for my computer room closet it would be more annoying in the middle of the night than necessary. I'll deal with a power outage when I wake up.

I am running NUT on Gentoo Linux to manage my Tripp Lite OMNI1000LCD UPS (USB) and to turn off the alarm one simply needs to run the following command, remember the username is what you defined in /etc/nut/upsd.users:

#upsrw -s ups.beeper.status=disabled -u nutusername
-p nutpassword theUPS@localhost:3493


immediately following that the command
upsc verified the change was live:

# upsc theUPS@localhost
battery.charge: 53
battery.type: PbAc
battery.voltage: 12.3
battery.voltage.nominal: 12.0
driver.name: newhidups
driver.parameter.port: auto
driver.version: 2.1.0
driver.version.data: TrippLite HID 0.1
(experimental)
driver.version.internal: 0.30
input.frequency: 59.8
input.voltage: 116.7
input.voltage.nominal: 120
output.frequency.nominal: 60
output.voltage.nominal: 120
ups.beeper.status: disabled
ups.delay.reboot: 65535
ups.delay.shutdown: 65535
ups.mfr: Tripp Lite
ups.model: TRIPP LITE UPS
ups.power.nominal: 1000
ups.serial: 692195 B
ups.status: OL CHRG

Now when there is a power loss to the unit it is silent and will shut down the computer when the low battery signal occurs.

keywords: UPS, NUT, alarm off, beeper off, disable alarm, disable beeper, linux, Gentoo, Tripp Lite OMNI1000LCD UPS USB.

Sunday, January 28, 2007

Enlighten your windows desktop or background with the Computer Name - BGInfo

In my current employment, I am typically remote "desktoped" (RDP'd) into several machines at the same time. The tool I use to keep myself informed is BGInfo a SysInternals (now owned by Microsoft).

For instance see below. There is a nice background, overlayed with particular machine information.

This tool is for the admin and people with some windows know-how, but still I would love to wrap this tool up in a little installer to add a little more value like an example configuration file and allow it to use a config file and run on startup.

I am willing to bet that several people in the legal department at MS would not be willing to let me redistribute this tool with my own MSI. I am not willing to experiment and find out for sure.

Instead of an installer, I'll list out the minor steps that made this tool more valuable to me and provide the configuration as above for you to experiment with.

Configuration

  1. Download the BGinfo zip from Sysinternals site
  2. Unzip into C:\Program Files\BGInfo (or a path of your choice)
  3. Download my example configuration BGsetup.zip.
  4. Unzip into C:\Program Files\BGInfo
  5. Launch BGInfo.exe by double clicking.
  6. Use the File Menu -> Open to open the bgsetup.bgi file.
  7. Tweak as you see fit. Hit apply and view the results.
Autorun BGinfo at Windows start up
  1. You could download autorunBGInfo.zip, a registry entry and double click the .reg file to put it in your registry
    OR
  2. Add the following to your registry:
    Key Location: [HKEY_LOCAL_MACHINE\SOFTWARE\
    Microsoft\Windows\CurrentVersion\Run]
    String Name/Value:
    Name: BGIno
    Value: \"C:\\Program Files\\BGInfo\\Bginfo.exe\" \"C:\\Program Files\\BGInfo\\bgsetup.bgi\" /timer:0 /silent /all

With those two things together, this tool is more valuable to me. Notice that you aren't limited to only the options listed in GUI. A quote from the BGInfo manual:

If BGInfo does not contain information you would like to display you can create a user defined field that contains whatever information you want. You can define one or more custom fields that display:
· An environment variable;
· A registry value;
· The contents of a text file;
· The version information contained in a DLL or executable file;
· The time stamp (last modified date) of a file;
· The output of a VB Script;
· The result of a Windows Management Instrumentation (WMI) query.

For the working soul in the tech industry, I can imagine that data could add further value to your desktop.

Keywords: BGInfo, Background text, background overlay Windows, Machine information desktop overlay, Wallpaper text configurator, machine information on background, Machine information on desktop, solve the what machine am I logged into problem, desktop background, desktop wallpapter.

Sunday, January 21, 2007

HOWTO customize your D-Link DSM-G600 NAS with Telnet (BusyBox), iTunes server, gentoo and more.

To solve the always on storage, network attached storage [NAS], problem I choose to purchase the D-Link DSM-G600 device; in part because my tendency to stick with a the same hardware vendor. I may be naive and my demonstration is I believe that companies do more testing with their own hardware components than other hardware. The other part of the choice is that is a Gigabit NAS with a drive enclosure and with potential to plug in our external USB drives. The other, other part is that it is running Linux underneath.

I have the DSM-G600 revB and to demonstrate this last statement of it running a copy of embedded Linux, the following is the output of uname.
# uname -a
Linux NAS 2.4.21-pre4 #480 ¤­ 4¤ë 28 11:21:43 CST 2006 ppc unknown

And it looks like the below image
First step is to understand 'fun_plug'. This is a script that is called after after the DSM-G600 boots, but the user has full control over it. It resides on the drive that you've put into the enclosure. For the full background: How to fun_plug . This concept is a big seller to me, it allows customization to your heart's content.

Starting to fun_plug
(reference: Wiki Page Howto fun_plug )

There are several way to get the fun plug script on the device. I would recommend connecting via Samba from a Linux host. Most importantly you'll save yourself the hassle of Unix vs. Windows linefeeds.

(1) You'll want your DSM-G600 booted (and a drive in the enclosure).
(2) From your linux host:
mount -t smbfs -o username=admin ///HDD_a /mnt/nas
(3) Enter your password (the same as the web interface admin password).
(4) Execute:
touch /mnt/somedir/fun_plug
chmod 777 /mnt/somedir/fun_plug
(5) Customize fun_plug (open fun_plug up and do some customization) - See below
(6) Execute: umount /mnt/nas


Customization of fun_plug

There many customizations and the the limit only in your imagination . Several that seem worthy to mention are starting a telnet daemon, starting an itunes server, chrooting to a Gentoo distribution.

Starting small
output dmesg to a text file

(1) Open fun_plug with your favorite editor
emacs /mnt/nas/fun_plug
(2) Add
#!/bin/sh
dmesg > /mnt/HD_a2/dmesg.out
(3) reboot the DSM-G600

Why /mnt/HD_a2? because that is where the NAS device mounts the internal IDE drive.


Getting bigger
Telnet daemon (and more) Telnet and your DSM-G600
(1) Open fun_plug in your favorite editor
(2) enter the following
#!/bin/sh
if [ ! -e /mnt/HD_a2/ash ]
then
ln -s /mnt/HD_a2/busybox /mnt/HD_a2/ash
fi
if [ ! `grep root /etc/shadow` ]
then
echo kontroll.`grep admin /etc/shadow` >> /etc/shadow
/mnt/HD_a2/sed -i -e 's/kontroll.admin/root/' /etc/shadow
fi
/mnt/HD_a2/sed -i -e 's/root:.*/root:x:0:0:Linux User,,,:\/:\/mnt\/HD_a2\/ash/' /etc/passwd
cd /dev && /mnt/HD_a2/busybox makedevs ptyp c 2 0 0 9
cd /dev && /mnt/HD_a2/busybox makedevs ttyp c 3 0 0 9
/mnt/HD_a2/busybox telnetd &
(3) Get and extract
busybox-telnetd-1.2.1.tar.bz2 in the root folder of the DSM-G600. Download it
(4) reboot the DSM-G600

Medium sized
Firefly/mt-daapd itunes server on your DSM-G600
Step by Step: Step by Step for itunes server on DSM-G600

Slightly larger than Medium
A NFS server server on your DSM-G600
(1) Download the nfs binaries (nfs-utils-1.0.10-portmap5-nfsd.tar.gz)
(2) Unzip in an appropriate folder
(3) Add this to fun_plug
# nfs server
# Vars. Change these according to your setup
NFSROOT=/mnt/HD_a2/nas_packages/nfs

# Set up needed directories and files
if [ ! -d $NFSROOT/var/lib/nfs ]
then
mkdir -p $NFSROOT/var/lib/nfs
fi

if [ ! -d $NFSROOT/etc ]
then
mkdir -p $NFSROOT/etc
fi

if [ ! -f $NFSROOT/etc/exports ]
then
cat > $NFSROOT/etc/exports <<"EOF"
/mnt/HD_a2 192.168.0.0/24(rw)
EOF
fi

if [ ! -f $NFSROOT/etc/hosts.allow ]
then
cat > $NFSROOT/etc/hosts.allow <<"EOF"
lockd: 192.168.0.*
rquotad: 192.168.0.*
mountd: 192.168.0.*
statd: 192.168.0.*
EOF
cat > $NFSROOT/etc/hosts.deny <<"EOF"
lockd:ALL
mountd:ALL
rquotad:ALL
statd:ALL
EOF
fi

if [ ! -d /usr/sbin ]
then
mkdir -p /usr/sbin
fi

# Make symlinks
ln -s $NFSROOT/etc/exports /etc/
ln -s $NFSROOT/var/lib /var/
ln -s $NFSROOT/etc/hosts.* /etc/
ln -s $NFSROOT/sbin/* /usr/sbin/

# start the server
/sbin/insmod $NFSROOT/modules/nfsd.o
/usr/sbin/portmap
sleep 1
/usr/sbin/rpc.mountd
sleep 1
/usr/sbin/rpc.nfsd
sleep 1
/usr/sbin/rpc.statd
# re-export...

$NFSROOT/sbin/exportfs -ra
(4) Reboot the DSM-G600.

Reference (Forum post)


Big and Bold
chroot into Gentoo on DSM-G600
Step by Step: Chroot to Gentoo

There you have it, the world is yours now that you are in Gentoo. Enjoy it.

References:
DSM-G600 revB Hack Forum
A well organized Wiki about the DSM-G600 revB

keywords:D-Link DSM-G600, dlink DSM-G600, linux, NAS, configuring, fun_plug, fun plug, Customizing DSM-G600, embedded linux on DSM-G600, tweaking DSM-G600, itunes DSM-G600, telnet DSM-G600, gentoo DSM-G600, D-Link NAS, gentoo, embedded linux.

Friday, December 29, 2006

LiveJournal to Blogger conversion/import tool - lj2blogger

Sept 29, 2007 update - An updated tool (renamed to Blog2Blog)is available see this post for download. Regardless, We will keep this post and the download around for posterities sake. My advice would be to try the current blog2blog tool which has better error handling and updated functionality but the choice is yours.


As unknown surprise to the Blogger staff that picked my blog for the blog of note, I've been working on a tool to import LiveJournal blogs into Blogger. I may as well post this today for all of you incoming viewers. I wish I had something witty and amusing to say in addition, but words fail. I am certain I'll think of something in a couple of days, my mind just works that way -- slow and steady?

Like many good ideas, this one came from my wife who wanted to migrate from LiveJournal to Blogger. I looked around and didn't find a conversion tool after several attempts to Google it. Thus, as a good software developer I spent the time to learn several things and build a tool.

Note, I would say this is a Beta at this point. It works well for the scenarios I've run it through. Please feel free to comment/suggest improvements through the blog comments.

Download lj2blogger (1.5.0 updated Feb 12, 2007)


The above is a .zip with a Windows installer. To install unzip and double click on setup.exe.

After installing there is a small manual:
"LiveJournal2Blogger Manual.rtf" at C:\Program Files\Cooley Computing Inc\lj2blogger\doc (default location).

To save you the time of opening this file it is below.

LiveJournal2Blogger (lj2blogger)

Introduction

This tool migrates a blog from LiveJournal to Blogger. It uses the public API of LiveJournal and the public API of Blogger to extract data from Livejournal and create equivalent entries in a Blogger account with the appropriate date/time of the orignal entry.

Features
- Download Journal Entries from LiveJournal
- A simple read-only viewer of downloaded entries
- Publish Journal Entries to Blogger
* upload private entries (it will make them public)
* parse entries and wrap http:// entries with HTML to make them active links
- Delete ALL entries for a Blogger journal
- Save/Load journal entries to/from file.

Usage

The designed usage pattern is below. For issues please feel free to contact me at pcooley.newsgroups at gmail.com.

Download from LiveJournal
1. Enter username (e.g. user1).
2. Enter password (e.g. pass1).
3. Enter lj-url (the URL of the livejournal you wish to download): http://user1.livejournal.com.
4. (optional) if necessary modify the api-url of your journal. This is autopopulated with a typical value.
5. Press Fetch from LiveJournal Button.

View Entries (optional)
6. Press View Entries Button.
7. Use the Entry Number Dialog to change the entry being viewed.
8. When complete Press the upper right close window (the X).

Save Entries (optional)
1. Press Save Entries
2. Choose the filename, it is an XML file with the extension (*.J2B)
Note: once saved you can load these Entries without downloading from LiveJournal (use the Load Entries button)

Publish to Blogger

9. Enter username (e.g. user1).
10. Enter password (e.g. pass1).
11. Enter lj-url (the URL of the livejournal you wish to download): http://user1.blogspot.com.
12. (optional) if necessary modify the api-url of your journal. This is autopopulated with a typical value. (if you have a non-upgraded blog take note; for non-upgraded blogs you will need to update the api-url! To find the URL you will have to look at the page source of your journal. See below for more information)
13. (optional) select options you please; publish private entries and/or wrap http:// with <a href=”…”>.
14. Press Publish to Blogger Button.
15. Select the Entries you will to publish (defaults to all entries).

Further instructions (non-upgraded blogs):
For non-upgraded blogs you will need to find your feed URI.
-- To do this you will have to use your favorite browser and type in the URL of you blog (e.g. http://user1.blogspot.com)
-- Using your browser you will need to 'View Source'. This differs slightly between browsers.
-- In the source look for link rel="service.post" type="application/atom+xml" title="User1 (Atom 1.0)"
-- The api-url is the http:// location in the href

Additionally it is not possible to post to an old journal with a new 'google' integrated account (for those of you that have only partially upgraded all your journals). Addtionally the publish dates of your livejournal won't be regarded. This is part of the API limitation.


Known issues

• The Application is not multithreaded – The UI refreshes slowly while connected to LiveJournal/Blogger.
• Does not import/export comment
• found 01/02/2007 - defaults for api-url only work with upgraded blogs.
• There are connection problems with the XMLRPC interface to livejournal, but immediately retrying Fetch from Livejournal seems to connect sucessfully. Just try a couple of times. No harm should be done.


It appears today I made the blogs of note on blogger.com Blogs of Note. Incoming hits galore!


Happy Blogging


Keywords: Blog migration tool, LiveJournal to Blogger migration, LiveJournal to Blogger conversion, transfer blog to Blogger, Import blogs from LiveJournal into Blogger, lj2blogger, livejournal2blogger, migrate livejournal blogger.

Thursday, December 28, 2006

Energy Usage of My Computers (Kill-A-Watt)

Getting a fine gift, A Kill-A-Watt device, from my Sister and Brother in-law last year meant I could measure the energy usage of my computer systems. Not necessarily a HOWTO article, but informative for those of us that obsess over numbers and metrics.

The Server Closet contains:
(1) Server (512MB/AMD Athlon(tm) XP 1600+)
(2) D-Link DI-724GU Router
(3) Comcast Cable modem (Motorola SB5120)
(4) Vonage Phone Adapter (Motorola VT1005V)
(5) Oregon Scientific WMR-968 Weather Station
- Note No Monitor

Power Usage:
1.34 Amp
125 Watts
2.95 KWH per day

My Primary System consists of:
(1) User System (1GB/Pentium 4 - 3.00GHz)
(2) Monitor 1 - Dell 2001FP 20" LCD
(3) Monitor 2 - Sony GDM-500PS CRT
(4) Sound - Yamaha Receiver RXV420, KLH Speakers and Subwoofer Model HTA-4906.

Power Usage:
3.06 A
300 - 400 Watts (depending on whether it is rendering in game or relaxing writing a document)
4.30 KWH per day

Our computer room is on a 15 Amp fuse and it now makes sense when my wife's computer system is on and she turns on an electric space heater my resulting trip to the fuse panel. Given the above, I now expect that fuse is probably even being lenient on us, given her system probably uses 3.0 Amps (identical system).

Keywords: computer, power usage, watts, how much power does my computer consume

HOWTO set up NUT on Gentoo Linux for Tripp Lite OMNI1000LCD USB UPS

The below documents my configuration of a Tripp Lite OMNI1000LCD USB UPS to communicate with Gentoo Linux (2.6.17-gentoo-r8 kernel) in my home network using NUT (Network UPS Tools). Note this is much easier in Dec 2007 - see new howto here


Plugged into the UPS :
(1) Linux Server (Older machine with AMD XP processor)
(2) D-Link DI-724GU Router
(3) Comcast Cable modem (Motorola SB5120)
(4) Vontage Phone Adapter (Motorola VT1005V)
(5) Oregon Scientific WMR-968 Weather Station

The average draw of those components is around 125 Watts (you have a Kill-A-Watt device don't you? Kill-A-Watt link). During my two simulated power outages it appeared that this UPS would power those components for ~30 minutes.

This UPS was purchased at Costco, so with that ease of distribution I suspect there might be more of you out there that may want to do this, so I'll write down my steps of configuration for Linux/Gentoo. Truth be told, maybe the key feature of the UPS verses others? The pretty Blue LCD display panel; even my wife attests to it aesthetic value.

Configuration took the better part of a day because, I didn't realize/admit the 2.0.4 version of NUT didn't support my Tripp Lite USB UPS. Once I use the development tree of NUT it was much easier. I hope to save you that time.

1. Ensure your kernel has hid support compiled into it

- in 'make menuconfig' select the '/dev/hiddev raw HID device support'

Device Drivers --->
USB support --->
<*> Support for Host-side USB
[*] HID input layer support
[ ] Force feedback support (EXPERIMENTAL)
[*] /dev/hiddev raw HID device support

2. emerge 'sys-power/nut'

Guess what? This, as of January 1, 2007, does not have the support in it for the Tripp Lite USB models (nut 2.0.4-r1 in portage). Following this, you will have to fetch the development trunk from the fine people on the NUT development team and create a Portage overlay. From this trunk, it runs great. I spent significant time starting the newhidups driver with the response No matching USB/HID UPS found and it appears 20 googles. It just doesn't work ;)

Note: Everything I know about Portage overlays I learned while watching a 'Cold Case' episode, so it isn't too hard. Kudos to portage.

3. Get the development trunk from Subversion. Don't have subversion in Gentoo? Me neither, but a simple 'emerge subversion', got me a running version.

mkdir ~/src/nut
cd ~/src/nut
svn co svn://svn.debian.org/nut/trunk

This will get the latest source for nut in a directory called trunk in your home directory ~/src/nut

4. Create a Portage Overlay for the development trunk source.

We will want to do this so that portage knows what we are up-to. Admittedly you can go straight for the compilation of the nut source and figure out all the configuration necessary to get it to run in Gentoo, but it was already all figured out for sys-power/nut-2.0.4.r1 so lets use that.

References:
HOWTO Create an Updated Ebuild
HOWTO Install 3rd Party Ebuilds (slightly less relevant in our case.)

a. Package the source:
in dir ~/src/nut
cp -r trunk nut-2.1.0
note: we are making up a nut version that follows the portage convention.
tar -cf nut-2.1.0.tar nut-2.1.0
gzip nut-2.1.0.tar

b. copy the source into the portage distribution tree
cp nut-2.1.0.tar.gz /usr/portage/distfiles/

c. Create an overlay directory and add it to your make.conf (I am presuming you have root like powers aren't I? Keep this in mind)
mkdir -p /usr/local/portage && echo 'PORTDIR_OVERLAY="/usr/local/portage"' >> /etc/make.conf

d. copy the existing ebuild for nut into your new Portage Overlay directory

make the dir: mkdir -p /usr/local/portage/sys-power/nut
copy it: cp -r /usr/portage/sys-power/nut /usr/local/portage/sys-power/nut

e. create the new ebuild file (copying from the latest ebuild).
cd /usr/local/portage/sys-power/nut
cp nut-2.0.4-r1.ebuild nut-2.1.0.ebuild
note: remember to name this the same as tar file above.

f. remove the ebuilds you don't need (I like clean)
for me it was: rm nut-2.0*

g. edit the ebuild. I removed a patch that probably isn't necessary in the development trunk.
nano -w /usr/local/portage/sys-power/nut/nut-2.1.0.ebuild

I removed line 46 that started with 'epatch'

5. Manually step thru the emerge steps with ebuild (slow and cautious). Ebuild is a lower level tool that emerge uses.
Note: I am only going to compile the driver I need, it isn't a default driver so I need to use the NUT_DRIVERS directive to ebuild system. Additionally when I didn't do this, one of the drivers in the development tree had a compile time error.

a. The digest:
NUT_DRIVERS="newhidups" ebuild /usr/local/portage/sys-power/nut/nut-2.1.0.ebuild digest

b. The unpacking (the unzips the tar file you created earlier):
NUT_DRIVERS="newhidups" ebuild /usr/local/portage/category/program/program-version.ebuild unpack

c. The compile
NUT_DRIVERS="newhidups" ebuild /usr/local/portage/category/program/program-version.ebuild compile

d. The installation
NUT_DRIVERS="newhidups" ebuild /usr/local/portage/category/program/program-version.ebuild install

Without the NUT_DRIVERS declaration I got:
/bin/sh ../libtool --tag=CC --mode=link i686-pc-linux-gnu-gcc -I../include -O2 -march=athlon-xp -pipe -Wall -Wsign-compare -o blazer blazer.o ../common/libcommon.a ../common/upsconf.o
../common/parseconf.o
../common/state.o main.o dstate.o serial.o
i686-pc-linux-gnu-gcc -I../include -O2 -march=athlon-xp -pipe -Wall -Wsign-compare -o blazer blazer.o ../common/upsconf.o ../common/parseconf.o
../common/state.o main.o dstate.o serial.o ../common/libcommon.a
if i686-pc-linux-gnu-gcc -DHAVE_CONFIG_H -I. -I. -I../include -I../include -O2 -march=athlon-xp -pipe -Wall -Wsign-compare -MT cpsups.o -MD -MP -MF ".deps/cpsups.Tpo" -c -o cpsups.o cpsups.c; \
then mv -f ".deps/cpsups.Tpo" ".deps/cpsups.Po"; else rm -f ".deps/cpsups.Tpo"; exit 1; fi
cpsups.c: In function 'clr_cps_serial':
cpsups.c:110: error: 'TIOCM_DTR' undeclared (first use in this function)
cpsups.c:110: error: (Each undeclared identifier is reported only once
cpsups.c :110: error: for each function it appears in.)
cpsups.c:112: warning: implicit declaration of function 'ioctl'
cpsups.c:112: error: 'TIOCMBIC' undeclared (first use in this function)
cpsups.c: In function 'set_cps_serial':
cpsups.c:117: error: 'TIOCM_DTR' undeclared (first use in this function)
cpsups.c:119: error: 'TIOCMBIS' undeclared (first use in this function)

6. Configure NUT

Now that we've made this build, you can follow the steps at the wiki:
Gentoo HOWTO NUT (Network UPS Tools)

You'll get to start after the Install Software section. Yes, you'll need the newhidups driver. I am pasting in the article with a couple of mods for my UPS posterity/consistency.

I added the bit about adding a MONITOR line to uspmon.conf. This is necessary for upsmon to work

Configuring

Go to /etc/nut . Open ups.conf. Add to this file every UPS you want to monitor. Mine looks like this:

# [powerware]
# driver = bcmxcp
# port = /dev/ttyS0
# desc = "Server, adsl, 3com"


Change the values to something that fit's your configuration better and save. If you have a USB connection to your UPS, your entry might look like

[OMNI1000]
driver = newhidups
port = auto
desc = "Tripp Lite OMNI1000LCD USB"

Open upsd.conf. This file contains access-policy to the UPS's you have.

To only allow the same computer to connect to them, the file should look like this:

ACL all 0.0.0.0/0
ACL localhost 127.0.0.1

ACCEPT localhost
REJECT all


The ACL-lines are used to add hosts. The syntax is ACL name IP. If the name is placed after ACCEPT connections from there are accepted, if it's placed under REJECT, connections are rejected. This sort of reminds me of a hosts.allow file?

Next open upsd.users. This file contains accounts for users who can make modifications. The following line grants access to the user server to everything. This isn't integrated with particular logins from my observation. So you can make-up a new user/pass and run with that. The only place one needs to remember this if you are setting properties through NUT on the UPS.


[server]
password = changeme
allowfrom = localhost
actions = SET
instcmds = ALL
upsmon master


Next take a look at upsmon.conf. This is the UPS Monitor configuration. A scan through this file is going to answer more questions than me writing about it. It is pretty simple, but the below three changes are all I needed to make.

  1. in Gentoo we compiled the nut package using the 'nut' user, so ensure this is in there.
    RUN_AS_USER nut
  2. The UPS to monitor
    MONITOR OMNI1000@localhost 1 server changeme master
  3. for those of us with a measly single UPS for our home network you'll need this line:
    MINSUPPLIES 1


Next if you want look at upssched.conf too, it may be interesting if you want to schedule events. This will be useful if you want to automate something like "30 seconds after the power is out, send an email via SMTP." I currently am not interested in this

Finishing

Now, start the upsd and upsmon service:

/etc/init.d/upsd start
/etc/init.d/upsmon start

This should identify if there is some still wrong.
If nothing is wrong add them to the default runlevel

rc-update add upsd default
rc-update add upsmon default

If you didn't get any error when you started the services you seemed to configure it right. Else, have a look at the error output and think what might be wrong. One error I got was the permissions of the serialport, which is easy fixed with adding nut to the tty-group.

Testing

You'll be using tools upsc and upscmd

Test upsc and see if your UPS replies:

upsc yourupsname@yourupshost ups.status
specifically: upsc OMNI1000@localhost ups.status

If you get "OL" (On Line) everything is working good (if it is on the line and not battery).

To see every command your UPS supports, type

upscmd -l OMNI1000@localhost

A full status looks like the below.

#upsc OMNI1000@localhost
battery.charge: 100
battery.type: PbAc
battery.voltage: 13.4
battery.voltage.nominal: 12.0
driver.name: newhidups
driver.parameter.port: auto
driver.version: 2.1.0
driver.version.data: TrippLite HID 0.1 (experimental)
driver.version.internal: 0.30
input.frequency: 59.8
input.voltage: 117.5
input.voltage.nominal: 120
output.frequency.nominal: 60
output.voltage.nominal: 120
ups.beeper.status: enabled
ups.delay.reboot: 65535
ups.delay.shutdown: 65535
ups.mfr: Tripp Lite
ups.model: TRIPP LITE UPS
ups.power.nominal: 1000
ups.serial: 692195 B
ups.status: OL CHRG


7. Customization of and understanding UPSMON.

It is upsmon that will be responsible for a system shutdown when the battery level reaches a critical level. It is here that if you want to do magic like emails/etc, you'll want to look.


There you have it in 7 easy (or not so easy?) steps, it should be configured.

UPS/NUT References that will help.
Network UPS Tools Home
Nut-upsuser Mailing List Note: from my lurking on this mailing list, it is filled with people very helpful and with an abundance of experience with NUT.

Keywords: Tripp Lite, USB UPS, Tripp Lite Gentoo, Tripp Lite OMNI1000LCD, USB HID UPS Linux, Gentoo HID UPS, gentoo NUT portage overlay, Gentoo UPS NUT, Tripp Lite Linux, Tripp Lite OMNI1000LCD Gentoo, Tripp Lite OMNI1000LCD Linux, Tripp Lite OMNI1000LCD UPS.

Monday, December 11, 2006

HOWTO remove blocked packages in portage on gentoo

On my routine of weekly updates to my gentoo installation I often encounter blocked packages in response to the command 'emerge --update --deep --ask world'

[blocks B ] mail-mta/ssmtp (is blocking mail-mta/postfix-2.2.2-r1)

This, until I became familiar with it, seemed confusing. My analysis, the order of this response is what tripped me up in combination with the temptation of speed reading. My interpretation was 'blocks mail-mta/ssmtp. Is blocking mail-mta/postfix-2.2.2-r1?' The parenthesis caused me to consider this as a separate thought. It is not and is my fault for confusing myself; And aside, I'd love for the parenthesis to be removed. That interpretive linguistics analysis aside on to the point.

Looking at the statement mail-mta/ssmtp is blocking mail-mta/postfix. The simple thing to do is to say, I don't need ssmtp let me remove it. The portage command:

emerge --unmerge 'mail-mta/smtp'

In summary it is the first item listed that is the 'blocking' package, that is what you want to remove.

Then try again with 'emerge --update --deep --ask world'

Of course the removal of something needed is a bad idea, so be careful.

An introduction to Portage: link
A simple portage Wiki page: Portage and Ebuilds
The man page: Portage Man page
The "best-known practices" for working with Portage: HOWTO_Use_Portage_Correctly
keywords: gentoo remove blocked package, portage remove blocked package, gentoo blocks, portage blocks.

Wednesday, November 29, 2006

Patterns and Practices of Software Development

It appears to be low profile so I hadn't heard of this until a co-worker pointed out this MS Wiki where they are putting together a community to work on documenting patterns and practices.

Microsoft's Patterns and Practices Guidance Library


This is useful in two ways, (1) in defining some templates for creating better documentation. For instance there is a template for writing a Mini How To. It lists a number of good ideas to consider while writing a How To. (2) It provides documentation, an example How To: How To: Use Regular Expressions to Constrain Input in ASP.NET. Another example is they have checklists for instance they have a Web Services Security Checklist.

From my observation there are not necessarily 'deep' thoughts here. The statements all make sense, to the point that it seems like stating the obvious. The value is in that the thought have been persisted, collected and present in a clean and concise way. This means that in our haste to get a product out the door, we can walk through a relatively simple list to verify we didn't miss something obvious.

A good idea. I hope it continues to have contributions and a community is built around this.

Tuesday, November 28, 2006

HOWTO Forge (linux)

A friend of mine sent me this link. This is really my blog, on steroids and then some. A community of people making howtos for Linux. Smart. I wish I thought of it :-).

http://www.howtoforge.org/ - HOWTO Forge

I am definitely adding this to my resources. Maybe I should start to contribute.

Monday, November 27, 2006

HOWTO use microsoft's logparser to analyze IIS logs with example sql/code

Logparser can be your good friend if you have a large set of data (text form or otherwise) and you would like to summarize it. It can be used to analyze Microsoft’s Internet Information Server (IIS) logfiles, text based logfiles, XML files, Eventviewer data, Registry, Active Directory Objects, CSVs and more (see all the input formats at the end of blog entry).

The below is my documenting a howto use logparser with a number of examples. Most of the examples of IIS log parsing were not developed by me, rather there is a MS team that can be employed to do an IIS health check, these were the logparser SQLs they used.

Logparser to start

I recommend become familiar with:
logparser -h
In all truth all my needs have been answered in the command-line help. I may have googling for a solution, but the problem was solvable with careful reading.

Logparser and IIS logs.

Logpaser automatically reads the IIS header. In fact, I highly suspect that the reason for the tool’s existence began with the need to analyze IIS logs - the history and lore, I have not taken that much time to learn. I'll let you correct me?

Queries (examples):
updated March 2007 to add reverse DNS lookup, Referer URLs (sic), and Referer Summary (sic).
• Merge Multiple Log files
To consolidate log files into a single file.
logparser -o:IIS "select * into merged.log from ex*.log"
• A count of the Total Requests
logparser "select count(*) into IISLOG_TOTAL_REQ.csv from ex061023.log"
• How many unique clients
logparser "select count(distinct c-ip) into IISLOG_DISTINCT_CLIENTS.csv from ex061023.log"
• Top 20 URLs Hit
logparser "SELECT TOP 20 cs-uri-stem, COUNT(*) AS Hits INTO Analysis.csv from ex061023.log group by cs-uri-stem order by Hits DESC"
• Top 20 ASP pages Hit
logparser "SELECT TOP 20 cs-uri-stem, COUNT(*) AS Hits INTO Analysis.csv from ex061023.log where cs-uri-stem like '%%.asp' group by cs-uri-stem order by Hits DESC"
• Hit Frequency (how many hits per hour)
logparser "SELECT TO_LOCALTIME(QUANTIZE(TO_TIMESTAMP(date, time),3600)), COUNT(*) AS Hit_Frequency INTO IISLOG_ANALYSIS_HIT_FREQ.CSV FROM ex061023.log GROUP BY TO_LOCALTIME(QUANTIZE(TO_TIMESTAMP(date, time),3600)) ORDER BY TO_LOCALTIME(QUANTIZE(TO_TIMESTAMP(date, time),3600)) ASC"
• Bytes per Extension
What is the percentage of the bytes served per extension-type?
logparser "SELECT EXTRACT_EXTENSION(cs-uri-stem) AS Extension, MUL(PROPSUM(sc-bytes),100.0) AS PercentOfTotalBytes INTO IISLOG_ANALYSIS_BYTES_PER_EXT.CSV FROM ex061023.log GROUP BY Extension ORDER BY PercentOfTotalBytes DESC"
• Top 20 Clients Hitting this server
logparser "SELECT top 20 c-ip AS Client_IP,count(c-ip) AS PageCount from ex061023.log to IISLOG_ANALYSIS_TOP20_CLIENT_IP.CSV GROUP BY c-ip ORDER BY count(c-ip) DESC"
• REVERSEDNS of Top 20 Clients Hitting this server (reversedns(...) is a long running function for obvious reasons)
logparser "SELECT top 20 c-ip AS Client_IP, REVERSEDNS(c-ip),count(c-ip) AS PageCount from ex061023.log to IISLOG_ANALYSIS_TOP20_CLIENT_IP_WITH_DNS.CSV GROUP BY c-ip ORDER BY count(c-ip) DESC"
• Referrer Host Names directing traffic to this server with count of pages referred (summary)
logparser "SELECT ReferringHost, count(*) AS TotalReferrals, Min(cs(Referer)) AS ExampleRefererURL USING CASE EXTRACT_TOKEN(cs(Referer),2, '/') WHEN null THEN 'NoReferer' ELSE EXTRACT_TOKEN(cs(Referer),2, '/') END as ReferringHost into IISLOG_ANALYSIS_REFERER_HOSTS.CSV FROM ex061023.log group by ReferringHost order by count(*) DESC"
• Referrer URLs directing traffic to this server (full report)
logparser "SELECT EXTRACT_TOKEN(cs(Referer),2, '/') as RefererHostName, cs(Referer) AS RefererURL, count(cs(Referer)) AS TotalReferrals into IISLOG_ANALYSIS_REFERERURLs.CSV FROM ex061023.log group by cs(Referer) order by count(cs(Referer)) DESC"
• Unique Clients per Hour
This is two separate SQLs.
1. logparser -o:CSV "Select TO_LOCALTIME(QUANTIZE(TO_TIMESTAMP(date, time),3600)) as Times, c-ip as ClientIP into IISLOG_ANALYSIS_DIST_CLIENT_IP.LOG from ex061023.log group by Times, ClientIP"
2. logparser -i:CSV "Select Times, count(*) as Count from IISLOG_ANALYSIS_DIST_CLIENT_IP.LOG to IISLOG_ANALYSIS_HOURLY_UNIQUE_CIP.CSV group by Times order by Times ASC"
• IIS Errors and URL Stem (Error code > 400)
logparser "SELECT cs-uri-stem, sc-status,sc-win32-status,COUNT(cs-uri-stem) from ex061023.log to IISLOG_ANALYSIS_ERROR_COUNT.CSV where sc-status>=400 GROUP BY cs-uri-stem,sc-status,sc-win32-status ORDER BY COUNT(cs-uri-stem) DESC"
• IIS Errors by hour (Error code > 500)
Can answer if the errors are load related
logparser "SELECT TO_LOCALTIME(QUANTIZE(TO_TIMESTAMP(date, time),3600)), COUNT(*) AS Error_Frequency FROM ex061023.log TO IISLOG_ANALYSIS_ERROR_FREQ.CSV WHERE sc-status >= 500 GROUP BY TO_LOCALTIME(QUANTIZE(TO_TIMESTAMP(date, time),3600)) ORDER BY TO_LOCALTIME(QUANTIZE(TO_TIMESTAMP(date, time),3600)) ASC"
• Status Code distribution
logparser "SELECT sc-status, COUNT(*) AS Times from ex061023.log to IISLOG_ANALYSIS_STATUS_CODE.CSV GROUP BY sc-status ORDER BY Times DESC"
• Top 20 Longest time-taken (on average) pages
logparser "SELECT top 20 cs-uri-stem,count(cs-uri-stem) As Count,avg(sc-bytes) as sc-bytes,max(time-taken) as Max,min(time-taken) as Min,avg(time-taken) as Avg from ex061023.log to IISLOG_ANALYSIS_TOP20_AVG_LONGEST.CSV GROUP BY cs-uri-stem ORDER BY avg(time-taken) DESC"
• Top 50 longest requests
logparser "SELECT top 50 TO_LOWERCASE(cs-uri-stem),time,sc-bytes,time-taken INTO IISLOG_ANALYSIS_TOP50_LONGEST.CSV FROM ex061023.log ORDER BY time-taken DESC"
• Average Response time by Hour
logparser "SELECT TO_LOCALTIME(QUANTIZE(TO_TIMESTAMP(date, time),3600)), avg(time-taken) INTO IISLOG_ANALYSIS_AVG_RESP_TIME.CSV FROM ex061023.log WHERE cs-uri-stem like '%%.asp' GROUP BY TO_LOCALTIME(QUANTIZE(TO_TIMESTAMP(date, time),3600)) ORDER BY TO_LOCALTIME(QUANTIZE(TO_TIMESTAMP(date, time),3600)) ASC"
• Percentage Processing time by extension
logparser "SELECT EXTRACT_EXTENSION(cs-uri-stem) AS Extension, MUL(PROPSUM(time-taken),100.0) AS Processing_Time INTO IISLOG_ANALYSIS_PROCTIME_PER_EXT.CSV FROM ex061023.log GROUP BY Extension ORDER BY Processing_Time DESC"

As an added bonus, I’ve created a small cmd (windows) shell script that runs thru all (but the first) of these queries below against a log file. It is located at the following link
download it
Note it requires logparser on the path and has a commandline invocation of:
logparseranalysis.cmd ex061023.log

Logparser and creating separate SQL files (the file: argument)

You may have noticed that these SQLs can get a long, as is the way with SQL. Logparser provides the means to create a text file with these long sqls in it. Additionally the ability to pass arguments is of course a given. Next, an example is in order. To use the commandline below you will need to create a little text file (extension sql) with the contents of the below.

Command Line:
logparser file:iis.sql?logfile=ex061113.log

Text file: iis.sql
-- Start of SQL file --
SELECT
c-ip AS ClientIP,
cs-host AS HostName,
cs-uri-stem AS URIStem,
sc-status AS Status,
cs(User-Agent) AS UserAgent,
count (*) as Requests
INTO output.csv
FROM %logfile%
where time > to_timestamp('18:20:00', 'hh:mm:ss') and time < to_timestamp('18:45:00', 'hh:mm:ss') GROUP BY c-ip, cs-uri-stem, cs-host, cs(User-Agent), sc-status ORDER BY Requests DESC
-- End of SQL file --


Logparser and the files without headers

Don’t have a header in your csv file? With a little work we can define a logparser SQL that will map the empty fields to names with meaning. The automatic header row parsing will need to be turned off.
Command Line:
logparser -i:csv -headerRow:OFF file:dslog.sql?logfile=logwoutheader.log+outputfile=out.csv
Text file: log.sql
-- Start of SQL file --
select To_TimeStamp(MyDate, MyTime) as DateTime, field3 as MachineNane, field4 as PID, field5 as TID, To_Int(field6) as ErrorLevel, field7 as RegExp, field8 as Line, field9 as SID, field12 as Message using TO_TIMESTAMP(field1,'MM/dd/yyyy') as MyDate, TO_TIMESTAMP(field2, 'hh:mm:ss.lx') as MyTime into %OUTPUTFILE% from %LOGFILE% where ErrorLevel >= 35
-- End of SQL file --


Logparser and the eventviewer
Although already covered in a previous article, logparser can also connect to eventviewer and analyze those logs. It can even do this on remote machines. The below SQL is an example on how to detect locked out accounts.

Command Line:
logparser file:lockedoutaccounts.sql?DOMAINCONTROLER=HQDC01C

Text file: lockedoutaccounts.sql
-- Start of SQL file --
SELECT timegenerated AS TimeLockedout,
extract_token(strings, 0, '|') As UserName ,
extract_token(strings, 1, '|') AS OriginatingMachine,
EventID,
SourceName,
Message,
CASE EventID
WHEN 529 THEN 'Invalid userid/password'
WHEN 531 Then 'Account disabled out'
WHEN 539 Then 'Account locked out'
WHEN 530 Then 'Outside of logon time'
WHEN 532 THEN 'Account Expired'
WHEN 535 THEN 'Password Expired'
WHEN 533 THEN 'User not from allowed system'
WHEN 644 THEN 'Account Auto Locked'
WHEN 540 THEN 'Successful logon'
ELSE 'Not specified' END AS EventDesc,
strings
INTO lockedact.csv
FROM \\%DOMAINCONTROLER%\Security
WHERE EventID=644
-- End of SQL file --


Reference Material:
http://www.logparser.com/ the unofficial logparser site. It hosts a great knowledge base and an active forum.

How logparser 2.2 Works

To download: Download Logparser

Logparser Blog Entry

Logparser 2.2 Input formats:
• IISW3C: This is the IIS W3C Extended log file format.
• IIS: This is the IIS log file format.
• IISMSID: This is the log format for files generated by IIS when the MSIDFILT filter or the CLOGFILT filter is installed.
• NCSA: This is the IIS NCSA Common log file format.
• ODBC: This is the IIS ODBC format, which sends log files to an ODBC-compliant database.
• BIN: This is the IIS binary log file format.
• URLSCAN: This is the format for URLScan logs.
• HTTPERR: This is the IIS 6.0 HTTP error log file format.
• EVT: This is the Microsoft Windows Event Messages format.
• TEXTWORD: This is a generic text file, where the TEXT value is any separate word.
• TEXTLINE: This is a generic text file, where the TEXT value is any separate line.
• CSV: This is a comma-separated list of values.
• W3C: This is a generic W3C log file, such as a log generated by Windows Media Services or Personal Firewall.
• FS: This provides information about file and directory properties.
• XML: Reads XML files (requires the Microsoft® XML Parser (MSXML)) •
• TSV: Reads tab- and space- separated values text files
• •ADS: Reads information from Active Directory objects
• REG: Reads information from the Windows Registry
• NETMON: Makes it possible to parse NetMon .cap capture files
• ETW: Reads Event Tracing for Windows log files and live sessions
Logparser 2.2 Output formats:
• W3C: This format sends results to a text file that contains headers and values that are separated by spaces.
• IIS: This format sends results to a text file with values separated by commas and spaces.
• SQL: This format sends results to a SQL table.
• CSV: This format sends results to a text file. Values are separated by commas and optional tab spaces.
• XML: This format sends results to an XML-formatted text file.
• Template: This format sends results to a text file formatted according to a user-specified template.
• Native: This format is intended for viewing results on screen.
• CHART: Creates chart image files (requires Microsoft Office 2000 or later)
• TSV: Writes tab- and space- separated values text files
• SYSLOG: Sends information to a SYSLOG server or to a SYSLOG-formatted text file


Keywords: IIS log file analysis, IIS 6.0, IIS 5.0, IIS, logparser, logparser examples, logparser samples, logparser input formats, logparser output formats, logparser examples, howto use logparser, example sqls for logparser, how to use logparser, Analyzing IIS logs with logparser, logparser and files without headers, logparser eventviewer example, using logparser to analyze IIS logfiles, logparser sample code.

Sunday, November 26, 2006

How to add a DiggIt and Del.icio.us links/button to blogger

Do you want to make it easy have your blog be submitted to the social networking sites like Digg and Del.icio.us?

You can add the submission URLs to the Comment footer of each of your blogger posts.

Below is how to do this in both the new and old version of Blogger.

Heads Up Folks: I've recently updated a simplier way to do this at this new post here.

NEWEST BLOGGER

Thanks to Sabre for looking and finding this. As he writes in his blog SabreNews: HOWTO add "diggit" and "del.icio.us" links to blogger( not beta , but latest version)

1.check whether email post page element is added to your blog .
if not, you can add thru template --->page elements page in your blog admin page

2.after adding email-post , search for in the edit html page of Templage.
do not forget to check "Expand Widget Templates"

3.paste the following snippet before tag
::for DIGGIT
<a expr:href='"http://digg.com/submit?phase=2&url=" +
data:post.url + "&title=" + data:post.title'
target='_blank'>DiggIt!</a>
::for DEL.ICIO.US
&lt;a expr:href='"http://del.icio.us/post?url=" +
data:post.url + "&title=" + data:post.title'
target='_blank'>Del.icio.us</a>


OLD BLOGGER


(1) Goto your blogger Template.
(2) Search for the BlogItemCommentsEnabled section.
(3) Add the submission URLs following the template:
digg: http://digg.com/submit?phase=2&url=www.UniqueURL.com&
title=StoryTitle&bodytext=StoryDescription&topic=YourSelectedTopic
del.icio.us:
http://del.icio.us/post?url=www.UniqueURL.com&title=StoryTitle

The below is the example of the BlogItemCommentsEnabled section I am using.

<BlogItemCommentsEnabled><br><a href="http://digg.com/submit?phase=3&url=<$BlogItemPermalinkUrl$>&title=<$BlogItemTitle$>" Title="Submit To Digg" target="_blank"&gtDiggIt!</a> | <a href="http://del.icio.us/post?url=<$BlogItemPermalinkUrl$>&title=<$BlogItemTitle$>" Title="Del.icio.us" target="_blank">Del.icio.us</a> | <a href="<$BlogItemCommentCreate$>"
<$BlogItemCommentFormOnclick$>>
<$BlogItemCommentCount$> ;comments</a>


The blog I found this information in is:
Technology Wrap: Guide: How to add a DiggIt and Del.icio.us button to blogger

Keywords: Blogger, Submit URL links, Digg link, Diggit link, Del.icio.us link, Digg submit link, Diggit submit link, Del.icio.us submit link, HOWTO add Digg submit links to blogger, HOWTO add delicious submit links to blogger.

Wednesday, November 15, 2006

Paste Special Unformatted Text At Your Fingertips

This one is a pet peeves of Paul, I admit that sometime Rich Text is really a good thing. In our world of Windows Rich Text, there are times when I want to paste rich text and many more times I want to paste Text-only. My wife actually influenced me into realizing the need is great enough to research it. I've used the Paste Special command for a long time, but have been troubled by the lack of a short-cut key to it.

This article (link below) is a great howto create a macro to a shortcut key for MS Word. Which these days (Office 2003) translates directly to our Outlook 2003 Email Client. If you create this macro in Word, you can use it in composing your Outlook emails.

Paste Special Unformatted Text At Your Fingertips

The next extension would be to create a Windows wide Paste Special shortcut key. Sure, I'll add it to my project list ;)

Update: I won't yet bother with the Windows Wide implementation. It is done:
PureText - http://stevemiller.net/PureText/, a quick trial seems to suggest it works well.

A quote from the web-page:
Have you ever copied some text from a web page or a document and then wanted to paste it as simple text into another application without getting all the formatting from the original source? PureText makes this simple by adding a new Windows hot-key (default is WINDOWS+V) that allows you to paste text to any application without formatting.

After running PureText.exe, you will see a "PT" tray icon appear near the clock on your task bar. You can click on this icon to remove formatting from the text that is currently on the clipboard. You can right-click on the icon to display a menu with more options.


Keywords: Paste Special keyboard shortcut, paste special, paste unformatted text, paste unformatted text shortcut key, unformatted text paste, unformatted paste, Windows, Word, Outlook, Windows Wide unformatted paste.

Integer Types In C and C++

Unless I am switching back and forth between compilers often, I tend to need a kick (or look up) to recall the different implementations of integer types.

The below page of Jack Klein's is just that kick.

Integer Types In C and C++


The introduction, a copy-paste from the above site, and the sample program to run through your compiler is below.

Introduction

You would think that the basic integer types provided by the C and C++ languages wouldn't cause an much confusion as they do. Almost every day there are posts in the C and C++ newsgroups which show that many newcomers do not understand them. Some experienced programmers who are only familiar with one platform do not understand them either.

The most common source of confusion are the sizes of the integer types, and the range of values which they can hold. That is because the languages leave many features of the integer types implementation-defined, meaning that it is up to the particular compiler to determine their exact specifications. C and C++ do set minimum requirements for each of the integer types, but the compiler is free to exceed these limits.

Each compiler is required to document its implementation. This information should be available in the printed manuals, online help, or man pages which come with the compiler.

In addition, there is a required standard header named <limits.h> (&ltclimits> in newer C++ compilers) that provides information about the integer types that can be used in your programs at run time. A compiler is not required to provide a header like <limits.h> as a readable text file, but I do not know of any compilers which do not.

There are programs on this page to display the information that this file contains.


A Program To Display Integer Type Information Standard C++ Compilers


#include <iostream>
#include <climits>

using std::cout;
using std::endl;

volatile int char_min = CHAR_MIN;

int main(void)
{
cout << "Size of boolean type is "
<< sizeof(bool) << " byte(s)"
<< "\n\n";

cout << "Number of bits in a character: "
<< CHAR_BIT << '\n';
cout << "Size of character types is "
<
<< " byte" << '\n';
cout << "Signed char min: "
<< SCHAR_MIN << " max: "
<<< '\n';
cout << "Unsigned char min: 0 max: "
<< UCHAR_MAX << '\n';

cout << "Default char is ";

if (char_min < 0)
cout << "signed";
else if (char_min == 0)
cout << "unsigned";
else
cout << "non-standard";
cout << "\n\n";

cout << "Size of short int types is "
<< sizeof(short) << " bytes"
<< '\n';
cout << "Signed short min: "
<< SHRT_MIN << " max: "
<< SHRT_MAX << '\n';
cout << "Unsigned short min: 0 max: "
<< USHRT_MAX << "\n\n";

cout << "Size of int types is "
<< sizeof(int) << " bytes"
<< '\n';
cout << "Signed int min: "
<< INT_MIN << " max: "
<< INT_MAX << '\n';
cout << "Unsigned int min: 0 max: "
<< UINT_MAX << "\n\n";

cout << "Size of long int types is "
<< sizeof(long) << " bytes"
<< '\n';
cout << "Signed long min: " <<
LONG_MIN << " max: "
<< LONG_MAX << '\n';
cout << "Unsigned long min: 0 max: "
<< ULONG_MAX << endl;

return 0;
}

Keywords: C++, types, integer, int, short, long, char, bool, sizeof, C, compiler implementation of integer types, unsigned.

Sunday, November 12, 2006

HTML Validation Service (W3C Markup)

While exploring the internet trying to figure out a trivial little problem, I discovered a tool that the w3.org has provided to any and all users on the internet that I forgot about. It can validate a multitude of DOCTYPE from XHTML 1.0 to SVG 1.1 and several flavors in between.

A quote from the validator's FAQ:
"Most pages on the World Wide Web are written in computer languages (such as HTML) that allow Web authors to structure text, add multimedia content, and specify what appearance, or style, the result should have.

As for every language, these have their own grammar, vocabulary and syntax, and every document written with these computer languages are supposed to follow these rules. The (X)HTML languages, for all versions up to XHTML 1.1, are using machine-readable grammars called DTDs, a mechanism inherited from SGML.

However, Just as texts in a natural language can include spelling or grammar errors, documents using Markup languages may (for various reasons) not be following these rules. The process of verifying whether a document actually follows the rules for the language(s) it uses is called validation, and the tool used for that is a validator. A document that passes this process with success is called valid.

With these concepts in mind, we can define "markup validation" as the process of checking a Web document against the grammar (generally a DTD) it claims to be using."

This reminds me, I should remember to throw pages I publish through this tool. I expect it to be more pedantic than a web browser, but that is a good thing. I see a few things that I need to fix up on a could of my sites right now.

The Link: The W3C Markup Validation Service

They also provide a number of other tools such as:
A Link Checker
CSS Validator
Feed Validator
P3P Validator
RDF Validator
XML Schema Validator
HTML Semantic Extractor - Checks for metadata

Keywords: HTML validation, HTML, XML validation, XHTML, XHTML 1.0, XHTML 1.1, SVG, SVG 1.1, SVG 1.0, Web page validator, validate my html, validate the html on my website.

Thursday, November 09, 2006

HOWTO convert from Flash Video-FLV to AVI for free AKA Transcoding

This is a special request HOWTO on Transcoding. There is a soul out on the internet that wants to be able to convert Flash video (FLV) to AVI, MPEG (MPG), or WMV. For those of us out there that don't know this is called Transcoding. This is simply a matter of decoding the video to and an intermediate form and encoding the video to the chosen format.

Windows Instructions: (Linux instruction are down below)

Prerequisites for the method described below.
1. Firefox
2. The Video Downloader plugin for Firefox
3. Riva FLV Encoder 2. A free FLV encoder that can transcode as well.


The step-by-step HOWTO:

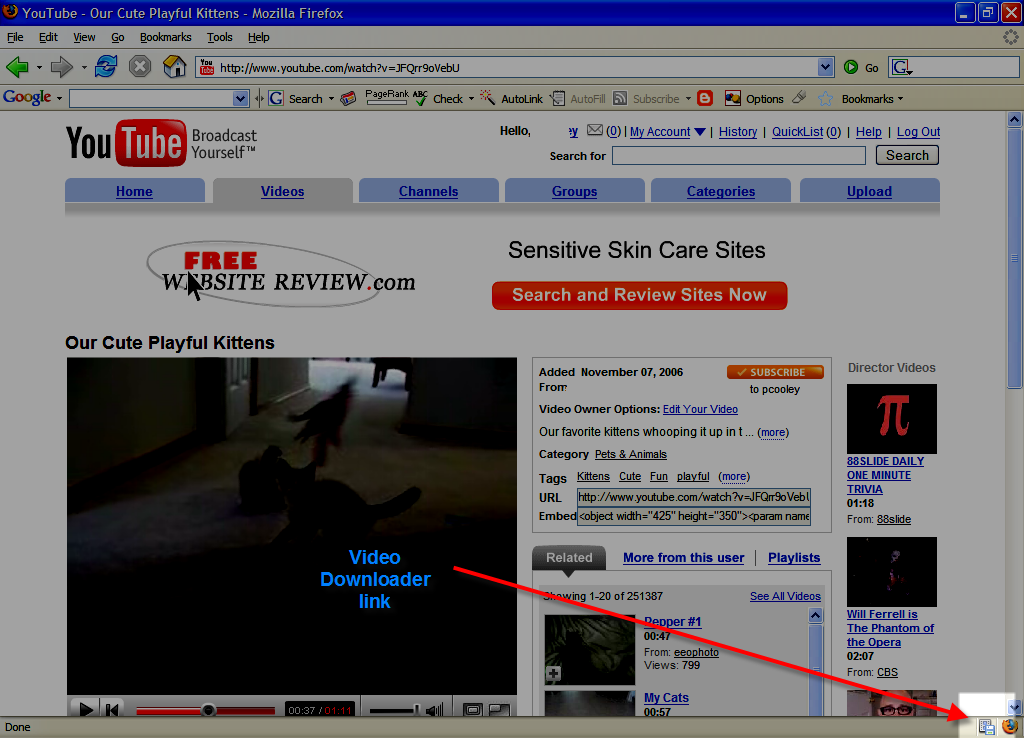
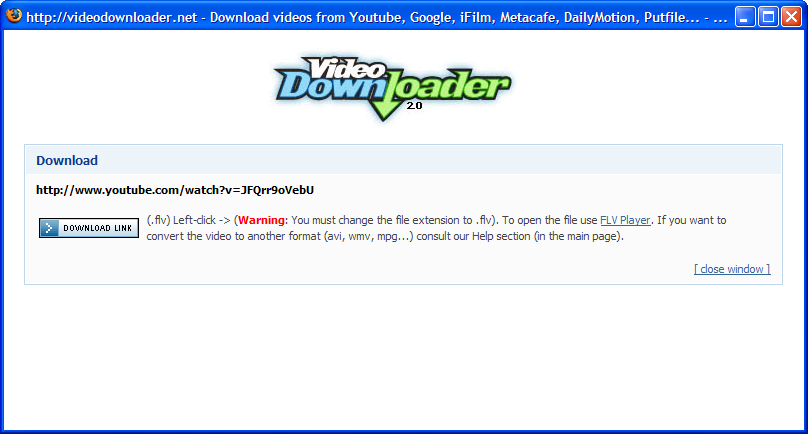
1. Pick a Flash Video to download. Click the Download Video Link.


2. Save the FLV video. Make sure to Rename it with an flv extension. It is weird that Video Downloader doesn't let us pick a name.


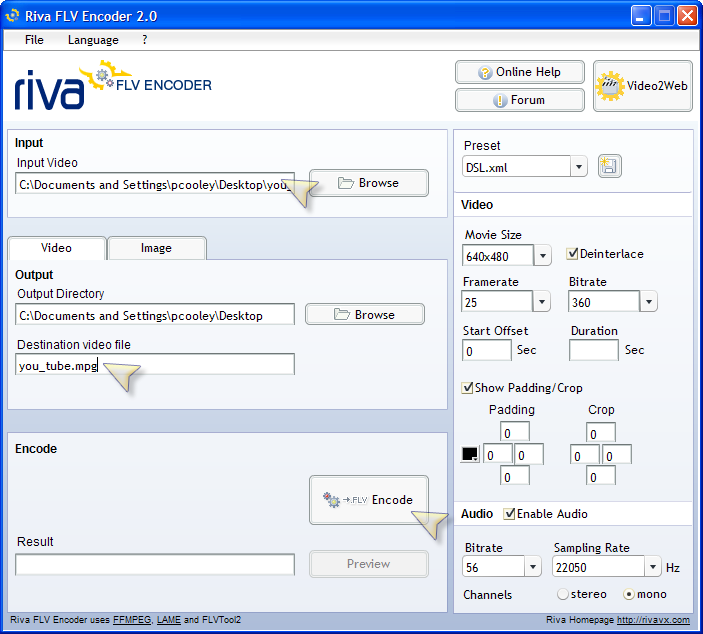
3. Start Riva FLV Encoder.
- Pick your FLV file or the input.
- Pick the location and name of output file
- Pick the extension you'd like to transcode into. (AVI or MPG). In my example I chose AVI.
- Press the encode button.


And there you have it, tada, you are done. When the Riva FLV Encoder 2 is complete, you've transcoded into another format.

Be aware that you might need to specifically have the codec for the AVI/MPG encoding you just did.

Reading briefly on the forum of Riva it appears that there are occasional gitches, sound problems with transcoding. It isn't a specifically supported operation, either.


Riva Links:
Riva Homepage
Riva Forums

Do you want to do this for Linux?
Take a look at this: Converting flv to mpeg in Linux
Of course you can download a flv file with Firefox in Linux

You will need ffmpeg.
And the simple commandline:
ffmpeg -i videotoconvert.flv -ab 56 -ar 22050 -b 500 -s 320x240 output.mpg


Keywords: Transcoding, FLV2AVI, FLV2MPG, FLV2MPEG, Convert Flash Video to AVI or MPEG/MPG, Convert FLV to AVI, Convert FLV to MPG, Howto Convert FLV to WMV, convert youtube videos, convert google videos.

Monday, November 06, 2006

InterfaceLIFT: High-Resolution Wallpaper

Not that this is very technical, but yesterday I found a good site for sharing and getting wallpaper/desktop backgrounds.

InterfaceLIFT's content is entirely vistor-submitted and is intended to be shared. They do a great job of search and provided a multitude of resolutions from 1024x768 to 2560X1600 as well as a number of other formats (ipod/sony psp).

My search for "Seattle" returned several of great photos of the city. Another search for "Vancouver" returned even more.

InterfaceLIFT: High-Resolution Wallpaper

The more sharing, the merrier and who can complain at the price of nothing?

And if you are looking for other art they have icons too. Have a new app that you want a cool icon for? I'd check these ones out.

Paul

Keywords: Wallpaper, Desktop background, images, free wallpaper, linux, windows, icons

Friday, November 03, 2006

HOWTO create ISO images and mount ISO images linux

As a comparison to my last post, all that work of installing applications is moot in Linux.

To create an image (link to a more verbose explanation) use dd on an unmounted CD/DVD drive:
dd if=/dev/cd of=cd.iso

To mount an image, if your kernel is compiled with the loopback block device and ISO 9660 built in (link to a more verbose explanation):

mount -o loop -t iso9660 cd.iso /mnt/isoimage/

Wikipedia on ISO

Keywords: ISO, mounting, ISO mounting, CD emulator, DVD emulator, Daemon Tools, Mount ISO, Linux, Linux CD emulator, Linux DVD emulator, Gentoo Linux.

Mount an ISO (CD/DVD) image in Windows CD/DVD emulator

CDs/DVDs, who needs them?

It is better to just mount the ISO image you need and live in the virtual world; when that works for you. It is harder to do an OS installation like that, but for many other cases, this is fine.

For Windows the best way to do that is to use Daemon Tools CD/DVD emulator.

the Daemon Tools download link

However, you may use the MS tool (not as slick as daemon-tools and unsupported ), it can be downloaded at:

Microsoft's Virtual CD/ISO mounting tool (Virtual CD Control panel)


Don't have an ISO? Create your own: ISO Recorder v2. This allows a simple right click on a CD drive to write an iso. e.g:

Wikipedia on ISO

Keywords: ISO, mounting, ISO mounting, CD emulator, DVD emulator, Daemon Tools, Mount ISO, Windows, Windows CD emulator, Windows DVD emulator.