Sunday, January 28, 2007

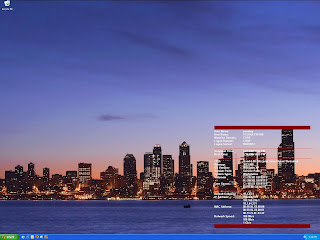
Enlighten your windows desktop or background with the Computer Name - BGInfo

In my current employment, I am typically remote "desktoped" (RDP'd) into several machines at the same time. The tool I use to keep myself informed is BGInfo a SysInternals (now owned by Microsoft).

For instance see below. There is a nice background, overlayed with particular machine information.

This tool is for the admin and people with some windows know-how, but still I would love to wrap this tool up in a little installer to add a little more value like an example configuration file and allow it to use a config file and run on startup.

I am willing to bet that several people in the legal department at MS would not be willing to let me redistribute this tool with my own MSI. I am not willing to experiment and find out for sure.

Instead of an installer, I'll list out the minor steps that made this tool more valuable to me and provide the configuration as above for you to experiment with.

Configuration

  1. Download the BGinfo zip from Sysinternals site
  2. Unzip into C:\Program Files\BGInfo (or a path of your choice)
  3. Download my example configuration BGsetup.zip.
  4. Unzip into C:\Program Files\BGInfo
  5. Launch BGInfo.exe by double clicking.
  6. Use the File Menu -> Open to open the bgsetup.bgi file.
  7. Tweak as you see fit. Hit apply and view the results.
Autorun BGinfo at Windows start up
  1. You could download autorunBGInfo.zip, a registry entry and double click the .reg file to put it in your registry
    OR
  2. Add the following to your registry:
    Key Location: [HKEY_LOCAL_MACHINE\SOFTWARE\
    Microsoft\Windows\CurrentVersion\Run]
    String Name/Value:
    Name: BGIno
    Value: \"C:\\Program Files\\BGInfo\\Bginfo.exe\" \"C:\\Program Files\\BGInfo\\bgsetup.bgi\" /timer:0 /silent /all

With those two things together, this tool is more valuable to me. Notice that you aren't limited to only the options listed in GUI. A quote from the BGInfo manual:

If BGInfo does not contain information you would like to display you can create a user defined field that contains whatever information you want. You can define one or more custom fields that display:
· An environment variable;
· A registry value;
· The contents of a text file;
· The version information contained in a DLL or executable file;
· The time stamp (last modified date) of a file;
· The output of a VB Script;
· The result of a Windows Management Instrumentation (WMI) query.

For the working soul in the tech industry, I can imagine that data could add further value to your desktop.

Keywords: BGInfo, Background text, background overlay Windows, Machine information desktop overlay, Wallpaper text configurator, machine information on background, Machine information on desktop, solve the what machine am I logged into problem, desktop background, desktop wallpapter.

Sunday, January 21, 2007

HOWTO customize your D-Link DSM-G600 NAS with Telnet (BusyBox), iTunes server, gentoo and more.

To solve the always on storage, network attached storage [NAS], problem I choose to purchase the D-Link DSM-G600 device; in part because my tendency to stick with a the same hardware vendor. I may be naive and my demonstration is I believe that companies do more testing with their own hardware components than other hardware. The other part of the choice is that is a Gigabit NAS with a drive enclosure and with potential to plug in our external USB drives. The other, other part is that it is running Linux underneath.

I have the DSM-G600 revB and to demonstrate this last statement of it running a copy of embedded Linux, the following is the output of uname.
# uname -a
Linux NAS 2.4.21-pre4 #480 ¤­ 4¤ë 28 11:21:43 CST 2006 ppc unknown

And it looks like the below image
First step is to understand 'fun_plug'. This is a script that is called after after the DSM-G600 boots, but the user has full control over it. It resides on the drive that you've put into the enclosure. For the full background: How to fun_plug . This concept is a big seller to me, it allows customization to your heart's content.

Starting to fun_plug
(reference: Wiki Page Howto fun_plug )

There are several way to get the fun plug script on the device. I would recommend connecting via Samba from a Linux host. Most importantly you'll save yourself the hassle of Unix vs. Windows linefeeds.

(1) You'll want your DSM-G600 booted (and a drive in the enclosure).
(2) From your linux host:
mount -t smbfs -o username=admin ///HDD_a /mnt/nas
(3) Enter your password (the same as the web interface admin password).
(4) Execute:
touch /mnt/somedir/fun_plug
chmod 777 /mnt/somedir/fun_plug
(5) Customize fun_plug (open fun_plug up and do some customization) - See below
(6) Execute: umount /mnt/nas


Customization of fun_plug

There many customizations and the the limit only in your imagination . Several that seem worthy to mention are starting a telnet daemon, starting an itunes server, chrooting to a Gentoo distribution.

Starting small
output dmesg to a text file

(1) Open fun_plug with your favorite editor
emacs /mnt/nas/fun_plug
(2) Add
#!/bin/sh
dmesg > /mnt/HD_a2/dmesg.out
(3) reboot the DSM-G600

Why /mnt/HD_a2? because that is where the NAS device mounts the internal IDE drive.


Getting bigger
Telnet daemon (and more) Telnet and your DSM-G600
(1) Open fun_plug in your favorite editor
(2) enter the following
#!/bin/sh
if [ ! -e /mnt/HD_a2/ash ]
then
ln -s /mnt/HD_a2/busybox /mnt/HD_a2/ash
fi
if [ ! `grep root /etc/shadow` ]
then
echo kontroll.`grep admin /etc/shadow` >> /etc/shadow
/mnt/HD_a2/sed -i -e 's/kontroll.admin/root/' /etc/shadow
fi
/mnt/HD_a2/sed -i -e 's/root:.*/root:x:0:0:Linux User,,,:\/:\/mnt\/HD_a2\/ash/' /etc/passwd
cd /dev && /mnt/HD_a2/busybox makedevs ptyp c 2 0 0 9
cd /dev && /mnt/HD_a2/busybox makedevs ttyp c 3 0 0 9
/mnt/HD_a2/busybox telnetd &
(3) Get and extract
busybox-telnetd-1.2.1.tar.bz2 in the root folder of the DSM-G600. Download it
(4) reboot the DSM-G600

Medium sized
Firefly/mt-daapd itunes server on your DSM-G600
Step by Step: Step by Step for itunes server on DSM-G600

Slightly larger than Medium
A NFS server server on your DSM-G600
(1) Download the nfs binaries (nfs-utils-1.0.10-portmap5-nfsd.tar.gz)
(2) Unzip in an appropriate folder
(3) Add this to fun_plug
# nfs server
# Vars. Change these according to your setup
NFSROOT=/mnt/HD_a2/nas_packages/nfs

# Set up needed directories and files
if [ ! -d $NFSROOT/var/lib/nfs ]
then
mkdir -p $NFSROOT/var/lib/nfs
fi

if [ ! -d $NFSROOT/etc ]
then
mkdir -p $NFSROOT/etc
fi

if [ ! -f $NFSROOT/etc/exports ]
then
cat > $NFSROOT/etc/exports <<"EOF"
/mnt/HD_a2 192.168.0.0/24(rw)
EOF
fi

if [ ! -f $NFSROOT/etc/hosts.allow ]
then
cat > $NFSROOT/etc/hosts.allow <<"EOF"
lockd: 192.168.0.*
rquotad: 192.168.0.*
mountd: 192.168.0.*
statd: 192.168.0.*
EOF
cat > $NFSROOT/etc/hosts.deny <<"EOF"
lockd:ALL
mountd:ALL
rquotad:ALL
statd:ALL
EOF
fi

if [ ! -d /usr/sbin ]
then
mkdir -p /usr/sbin
fi

# Make symlinks
ln -s $NFSROOT/etc/exports /etc/
ln -s $NFSROOT/var/lib /var/
ln -s $NFSROOT/etc/hosts.* /etc/
ln -s $NFSROOT/sbin/* /usr/sbin/

# start the server
/sbin/insmod $NFSROOT/modules/nfsd.o
/usr/sbin/portmap
sleep 1
/usr/sbin/rpc.mountd
sleep 1
/usr/sbin/rpc.nfsd
sleep 1
/usr/sbin/rpc.statd
# re-export...

$NFSROOT/sbin/exportfs -ra
(4) Reboot the DSM-G600.

Reference (Forum post)


Big and Bold
chroot into Gentoo on DSM-G600
Step by Step: Chroot to Gentoo

There you have it, the world is yours now that you are in Gentoo. Enjoy it.

References:
DSM-G600 revB Hack Forum
A well organized Wiki about the DSM-G600 revB

keywords:D-Link DSM-G600, dlink DSM-G600, linux, NAS, configuring, fun_plug, fun plug, Customizing DSM-G600, embedded linux on DSM-G600, tweaking DSM-G600, itunes DSM-G600, telnet DSM-G600, gentoo DSM-G600, D-Link NAS, gentoo, embedded linux.