Thursday, October 26, 2006

HOWTO create your 'own' Google custom search engine

Feature of the day from Google: build your own custom search engine from Google's data.

Check it out at Google Co-op Custom Search Engine.

Google's FAQ is here.

Why would you want this? For instance what if you wanted a search engine for your own 7 sites. You could use this to make a search for these 7 sites.

  1. Go to Google Co-op Custom Search Engine
  2. Click on the Create a Search Engine.
  3. Login to your Google account
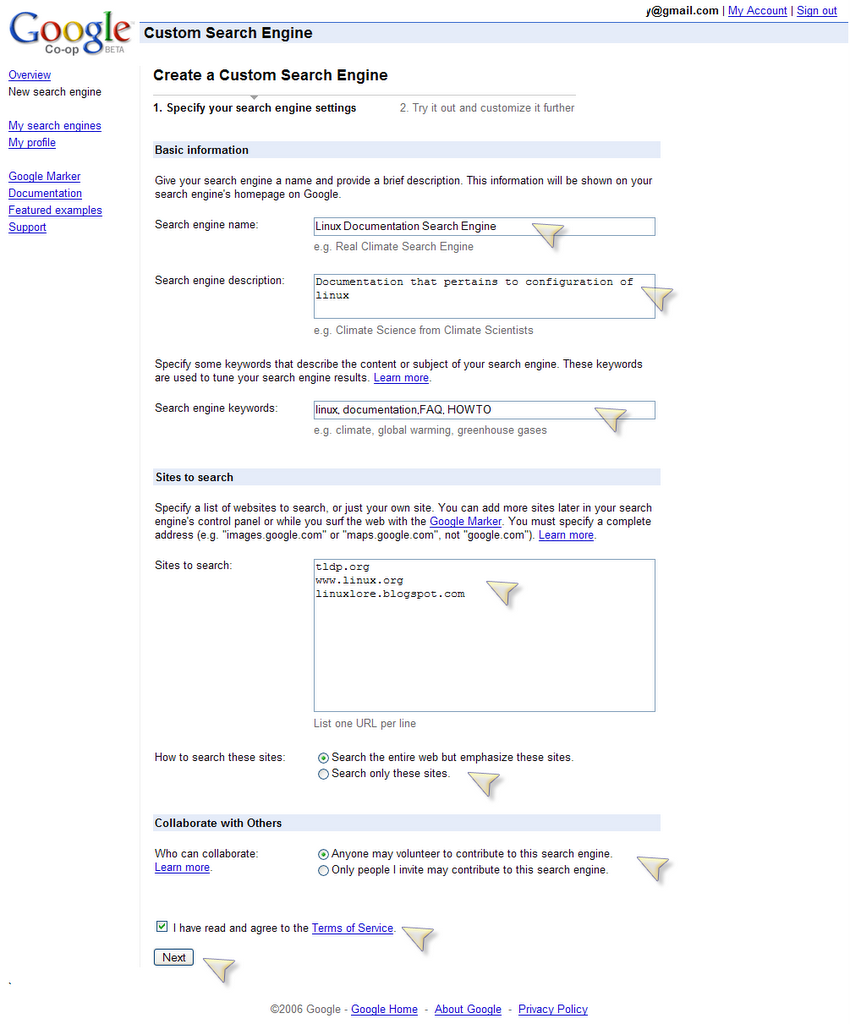
  4. Setup the 6 configuration points
    Name: The name for your custom search engine
    Description: A longer description
    Keywords: These are the keywords that pages that have them will be promoted in the search results. For example if you wanted to promote FAQ for your documentation search engine, the docs with FAQ will rank higher in the results.
    Sites to Search: the urls of sites you'd like in your search engine
    How to Search: Whether or not you'd like to include the 'internet' in the results or exclude it.
    Contributors: Whether or not it is a collaboration

  5. Hit the Next button and you have your custom search engine. The following page is simply to let you try it and to confirm it was created.


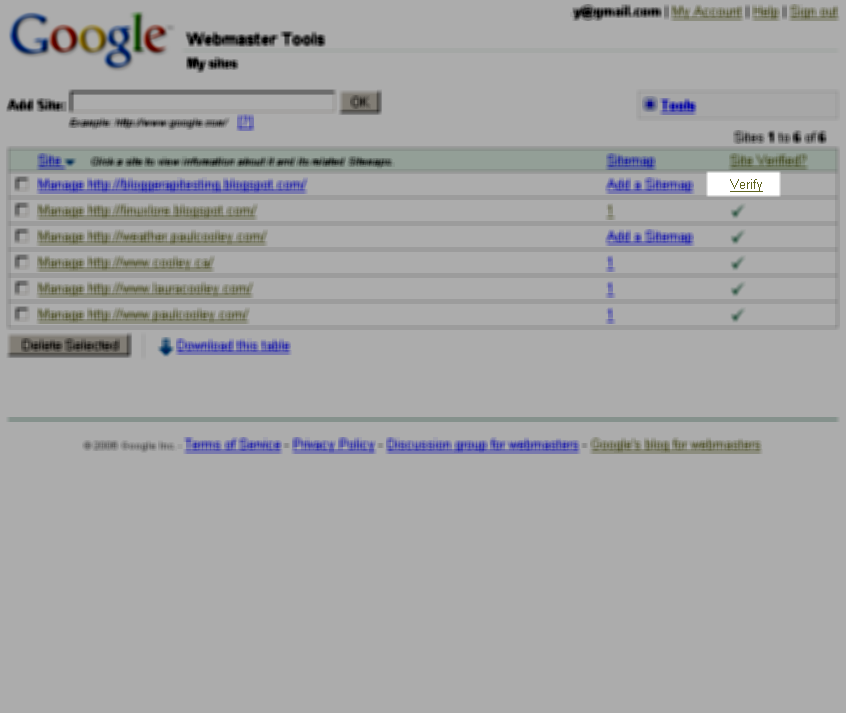
    I've created a search engine for my sites Paul Cooley's Sites and for Linux documentation
Going into the control panel for these sites you will find additional options like updating the look and feel, refinements, adding sites, code to be able to inject this custom search engine in a site, etc.

This ability to create these custom search engines and have them on our sites will be a big step. We now can filter the contents according to our suggestions. I think the opportunities will only be limited to our imaginations.

On that note, I wonder if there is an API. Imagine tweaking a 'search' dialog on the fly to the specifics a page or according to user selection?

Monday, October 23, 2006

Gentoo Linux HOWTO configure a SOCKS proxy server

Inspired by my wife's difficulty connecting to the internet due to new security policies at her organization, I decided to try a proxy to allow her to use Windows Live Messenger.


The Linux SOCKS proxy server implementation these days is made under the name DANTE. Their site is here.

In Gentoo it is in our Portage Tree so the step-by-step is here:

  • emerge dante
  • edit the config file (/etc/socks/sockd.conf). Open that file in your favorite editor
    It is in this file logging is enabled via the syslog mechanism and internal and external addresses are bound. Whereas the internal bindings include a port specification, the external one does not.
    The comments are well formed I'd also spend a little time looking them over.

    The details:
    logoutput: syslog

    internal: eth1 port = 1080
    internal: 127.0.0.1 port = 1080

    external: 1.2.3.4
    # or
    external: eth0
    To achieve full access (no username/password).
    method: username none

    # Not using authentication, so unnecessary
    #user.privileged: proxy

    user.notprivileged: nobody
    The access controls for sockd daemon are last. They are checked against in the order they appear in the configuration file. Notice, don't open your proxy server to the wild world - you've been warned.

    The first three directives control which IP ranges that have accesss to the server.
    - The from: is were the details of the IPs are added. In my cause it is the IP space the clients live in.
    - The to: option is one of the IPs the proxy server is bound to that the given IP range can speak to. It is set to the addresses Dante/sockd is listening on.
    The last of the three drops any requests that don't match either of the first two directives.

    client pass {
    from: 192.168.0.0/16 port 1-65535 to: 0.0.0.0/0
    }

    client pass {
    from: 127.0.0.0/8 port 1-65535 to: 0.0.0.0/0
    }

    client block {
    from: 0.0.0.0/0 to: 0.0.0.0/0
    log: connect error
    }
    The next four configuration points control who 'routing'.
    - Requests from anywhere to the loopback addresses are dropped.
    - From the loopback addresses and 192.168.0.0/16 are allowed to communicated over tcp or udp protocols.
    - Finally, drop everything else.
    block {
    from: 0.0.0.0/0 to: 127.0.0.0/8
    log: connect error
    }

    pass {
    from: 192.168.0.0/16 to: 0.0.0.0/0
    protocol: tcp udp
    }

    pass {
    from: 127.0.0.0/8 to: 0.0.0.0/0
    protocol: tcp udp
    }

    block {
    from: 0.0.0.0/0 to: 0.0.0.0/0
    log: connect error
    }
  • Start Dante/sockd.
    sockd -V // this verifies configuration and exits
    sockd -d // this enables debugging to the console.
    That will start Dante in debugging mode.

The help page for your reference
localhost ~ # sockd -h
sockd: usage: sockd [-DLNVdfhnv]
-D : run in daemon mode
-L : shows the license for this program
-N : fork of servers [1]
-V : verify configuration and exit
-d : enable debugging
-f <filename> : use <filename> as configuration file [/etc/socks/sockd.conf]
-h : print this information
-n : disable TCP keep-alive
-v : print version info

if you'd like sockd to start on the default runlevel:
rc-update add sockd default

Next would be configuring your browser and test this. Using IE configure it to use a proxy server and enter the server name port (1080), close the browser. Restart the browser and request a page. If it works, then great move on. Otherwise you'll start to debug (inspection of /var/log/* time).


Gentoo adding a service to the default run-level

This is done millions of times a week, I am sure. I just want to write it down so I hope to imprint it on my brain. It is very simple with Gentoo.

rc-update is the tool that Gentoo uses to abstract the guts that often are associated with adding a service to certain runlevels.

Example with adding ntpd to the default run level.

rc-update add ntpd default

RC-UPDATE MAN page details.
NAME
rc-update - add and remove init scripts to a runlevel

SYNOPSIS
rc-update add script <runlevels>
rc-update del script [runlevels]
rc-update show [--verbose] [runlevels]

DESCRIPTION
Gentoo's init system uses named runlevels. Rather than editing some
obscure file or managing a directory of symlinks, rc-update exists to
quickly add or delete init scripts from different runlevels.

All scripts specified with this utility must reside in the /etc/init.d
directory. They must also conform to the Gentoo runscript standard.

Saturday, October 21, 2006

Improved Seattle (WSDOT) traffic flow for mobile devices

My wife found that the Washington State Department of Transportation started creating traffic flow maps for mobile devices for the Greater Seattle (Puget Sound) area. One problem though, the page layout isn't ideal for most of our commuting; the maps are split across our routes. Downloading two pages on your blackberry? No thanks.

The solution? Build our own HTML page that references the all the small images so all of the images are loaded with one page. Then create links to the other reference pages such as the travel times.

Do you want to use our Seattle traffic flow maps for mobile or wireless devices? Just use the link you like better:

http://traffic.paulcooley.com
http://traffic.lauracooley.com

Happy Commuting in the Puget Sound area!
Paul Cooley

Seattle (WSDOT) traffic flow for handheld devices

Tuesday, October 17, 2006

HOWTO have a traffic map(image) as your screen saver

This HOWTO is for Windows XP. Traffic maps are becoming increasingly predominant. The age of the internet has improved us? In Seattle the traffic map is actually rendered as a GIF image.

If you are in the lucky few cities of:
Atlanta, San Francisco Bay Area, Chicago, Denver, Houston, Los Angeles, Louisville, Milwaukee, Minneapolis, OC/Inland Empire, Phoenix, Portland, Salt Lake City, San Diego, San Fernando Valley, Seattle

You can use the TrafficGauge download.

However, I've found the WSDOT traffic map is much more detailed than TrafficGauge.

An alternative solution is:

  • download SeqDownload - This utility allows you to schedule and automatic download of an image file
  • Install SeqDownload
  • Configure SeqDownload
  1. Run SeqDownload
  2. Click the Run at Startup, Click the Run In System Menu
  3. Click New (for a new scheduled download)
  4. Configure the URL (for Seattle: http://images.wsdot.wa.gov/nwflow/
    flowmaps/videomap_Seattle.gif)
    the link
    - Pick a New folder to download images into (c:\traffic\download)
    - Pick a time frame to download image (5 minutes?)
    - Select save to the same filename everytime
    - Pick the length of time for this downloading (1 year?)
    Press Create New Item

  • Setup the Window XP Screensaver to use this folder, of one image, for its Slide Show
  1. Right-click on the desktop - select Properties (or your favorite method to change the screensaver)
  2. Select the Screen Saver Tab followed by My Pictures Slideshow
  3. Select the directory that you are downloading the traffic image to (from the SeqDownload above - in my case C:\traffic\download)


Click OK and now the Seattle traffic map will be your screen saver, updating every 5 minutes with a new image.

Thursday, October 12, 2006

Google Webmaster Tools and HOWTO add a sitemap for Blogger/blogspot.com

The setting up of a Sitemap file for a Blogger/Blogspot.com is an easy thing to do. The question of what is a Sitemap file and why should I have one? is answered here

Prerequite:
(1) your site setup/verified in Google Webmaster Tools (more on that here my blog entry on that).

HOWTO:
(1) Login to Webmaster Tools (link)
(2) Click On the Add a Sitemap link
(3) Choose Add General Sitemap
(4) type in: *********.blogspot.com/rss.xml (your blog name for *********)
(5) Click on Add Sitemap button.

You are done! That is it. Simple.

After posting this I found that there is also an equivelant site at Yahoo - Yahoo Site Explorer It functions similarly and you could basically do the same thing over there.

Google webmaster Tools and HOWTO verify your Blogger/blogspot.com site

There are two important things you can do with the Google Webmaster tools for your blogger site.

One -> Verify your site
and
Two -> Submit a sitemap.

What we are interested in here is verifying a Blogger site (ONE!). So here is how to do that.

** Google Webmaster Tools Verify your Blogger site. **

(1) Control your blog site through Google Webmaster tools - login/signup for Google's Webmaster tools and add your blogger site *****.blogspot.com
(2) Click on the Verify link
(3) Choose Add a Metatag - note the META tag information
(4) In New Tab (Browser): Login to your Blogger account. Click on your blog of interest and click on the template tab. After the < >> tag paste in the META tag information as found in step (3)
(5) Republish your entire blog.
(6) Go back to the Google Webmaster tools - Click Verify. You are done and your blog has been verified. The next step you'll want to do is add a sitemap.

Wednesday, October 11, 2006

Tunneling Remote Desktop through SSH

I just googled this "port forwarding remote desktop putty" and just realized this is easy. I am remote desktop'ing' from windows machines outside of my home network into my home LAN into my Windows XP machine. PuTTY and openSSH can make this easy, maybe even ultra easy!

Prerequistes:

  1. A server running SSH (openSSH?) - of course this is a Gentoo Linux server at my house but it doesn't need to be. * Configuration for this is outside the scope of this blog.
  2. puTTY - download to the computer that will be the client
Setup Putty:

PuTTY is a free software SSH, Telnet, rlogin, and raw TCP client. It is perfect for this.
  1. Setup the Tunnel Port Forwarding in puTTY.
    - Click on the Tunnel. (configure the Tunnel configuration)
    - Enter a source port, this is the port on the local machine, 3390.
    - Enter a Destination IP or name and port number of 3389 using a colon separator character. An example is for a Remote Desktop session to the PC machinewithRDP.
    - Click the Add button
    - Repeat for other hosts
    - Click on SSH (configure the high level SSH)
    - Turn on compression
    - Use only SSH 2
    - Click on Session (configure session)
    - Save your settings
  2. Connect to the SSH server with your username/password
  3. Start up Remote Desktop
    - use the address of the port you setup in puTTY. localhost:3390
    - click Connect


You are done and connected! Nice work.

Keywords: Tunneling Remote Desktop through SSH with Putty and openSSH. RDP, Windows, Tunnel, Gentoo, Linux, D-Link Wireless Router, DI-724 DU.

Tunneling HTTP/WEB/Port 80 traffic(requests) thru SSH

I just bumped into something I've never done before but think is really cool. Tunnelling HTTP/Port 80 traffic through SSH.

A scenario that is valid for me. I would like to view a intranet website that is behind a firewall/router. The website isn't meant for public consumption, but for myself. For instance the D-Link Wireless router DI-724DU configuration page for my home network.

What you need:
(1) Server servicing SSH -- in my case a Gentoo Linux machine running SSHD and configured correctly). Reference name: remotehost.remotedns.org
(2) The DI-724DU (or some other router with port forwarding functionality). Reference name: di724-192-168-0-1 (192.168.0.1 is the default ip)
(3) The SSH port being forwarded to the above named server .
(4) A SSH client -- for me openSSH on an VMWare server with Gentoo on it (outside of my home LAN): Reference name: host.outsidenetwork.com

On the VMWare Gentoo Linux machine that is outside of my home LAN simply type:
(1) ssh -L 2022:192.168.0.1:80 username@remotehost.remotedns.org
where 192.168.0.1 is IP of the router di724-192-168-0-1
(2) Enter the username's password on the remotehost.remotedns.org machine
(3) Start a browser on host.outsidenetwork.com. Enter http://localhost:2022.

You will get the webpage of the D-Link DI-724 wireless router.

Cool! Simple as 1,2,3!

Tuesday, October 10, 2006

Tracking visits to a Webpage, Website or Blogger Blog (A HOWTO)

This can be accomplished in a variety of ways. However, I'll tell you the one way that I've used that seemed easy to integrate with the Blogger platform.

I am using sitemeter one of the many tracking sites out there.

I admit the following only: their website interface isn't completely smooth. I know what I wanted and for some reason the sitemeter site didn't lead me to it immediately. Maybe they need a step-by-step for the I-am-too-busy-to-read soul?


To add sitemeter.com tracking to your Blogger Blog:

My step-by-step guide

  1. Sign up for an account: Sign-up to Sitemeter
  2. Sign in.
  3. Click on the Manger link [Near the top of the page]
  4. Click on the HTML code link [on the side bar]
  5. For those of you Blogger Users (beta users need a different link), click on the Adding Site Meter to a Blogger or Blogspot site
  6. Use your login/password for blogger, and it can add the Site Meter HTML to your Blogger template.
  7. Or you can add it yourself
    Something like:

    < href="http://s17.sitemeter.com/stats.asp?site=s17yourloginname" target="_top">
    < img src="http://s17.sitemeter.com/meter.asp?site=s17yourloginname" alt="Site
    Meter" border="0" />

To add your sitemeter.com tracking to a webpage/website
  1. Simply put the HTML code of Step 7 of the Blogger tracking into your HTML page.

Monday, October 09, 2006

install DB2 on Gentoo (Part 2)

It has come to my attention that there is significant interest in installing DB2 on Gentoo Linux.

I am running the kernel 2.6.17-gentoo-r8 on an AMD Athlon(tm) XP. It is a fully up to date on all installed packages as off the writing of this Blog.

1. Pre-requistes
Emerge the rpm package and any of its pre-requisites:

emerge rpm

2. Installation
Follow the installation section of 15.2 at: The Linux Documentation Project - Installing DB2 Version 8.2 on Gentoo (2005-01-17)
Pay attention to that step 4. It suprised me. You need to type in the product name of the only product on the list. Intuitive?
3. Post Installation configuration
Follow steps 1 - 3 in section 15.3 at: The Linux Documentation Project - Installing DB2 Version 8.2 on Gentoo (2005-01-17)
Insert a step 3.5: Ensure / directory access read permissions for users in my out of the box installation of gentoo see further detail in this post of mine. As root Run this command:
chmod a+rx /
Continue with step 4
4. I also enabled remote connections section 15.3.1: The Linux Documentation Project - Installing DB2 Version 8.2 on Gentoo (2005-01-17)
5. Install IBM Software Developer's Kit for Java:

rpm --force --nodeps -ivh db2/linux/Java-1.4/IBMJava2-SDK-1.4.1-2.0.i386.rpm

6. I was then able to run db2cc as the user db2inst1.


Following all that I created a database through the control center.

My next goal is going to be a tougher one (I suspect): to see if I can install Rational CQ on Gentoo.

Enjoy,
Paul

HOWTO find what network card is installed (PCI)

'Which network drivers to compile into the kernel? ' This has been a common question of mine theme over many years of using Linux. From Slackware of 1996 days to last month when I rebuilt the kernel on my Gentoo Linux server. I don't compile the kernel often, and in the months between it happening or when I bring up a new machine and I didn't remember which adapter I installed the week before, etc.

In the past this brought me to the following
(1) Non-optimal - Open up the computer case, physically inspect the network card
(2) Non-technical - Label the back of the Ethernet Adapter card with the vender/model
(3) Latest - run the command: lspci | grep Ethernet

lspci - List all PCI devices

Note this could also remind you of what video adapter is installed, or any other PCI adapter for that matter.

Bash Shell commands quick reference

I've been using www.ss64.com for several years to remember:

(1) Windows NT, 2000, XP, 2003, etc shell commands
(2) Oracle PL/SQL syntax
(3) Bash Shell commands

Here is a link to the Bash Shell commands: Linux commands

I also noticed while composing this post they have a SQL Server 2005 section. That is news to me. I recommend using this reference for either the Windows or bash shell in a 'what was that command syntax sort of moment'.

Sunday, October 08, 2006

Gentoo HOWTO Update Portage?

Even the simple things can confuse. Imagine seeing this message?

* An update to portage is available. It is _highly_ recommended
* that you update portage now, before any other packages are updated.
* Please do so and then update ALL of your configuration files.

What would a reasonable person do? Cry? Probably. Why doesn't it strike me immediately to use portage to update portage? I don't know.

The solution:

emerge portage


HOWTO - Gentoo on VMWare server

VMWare has been doing a great job in PC virtualization. I've been using VMWare as a test bed for attempting new configurations in Gentoo.

Many have worked on the Gentoo installation since I did my installation around May of 2006. It was a significant amount of work gleening thru the various different VMWare articles in the gentoo Wiki to understand it. Quite possibly I don't yet, but it works day in and day out, so it is a 'close enough'. I am writing this up months after the facts, so I might be a little fuzzy on the details, so don't let me distract you.

Googling on it today Oct. 8, 2006 reveals this, I might try that if I were ready to try again.
HOWTO Install VMWare Server - Gentoo Linux Wiki

The primary article I used in May 2006:
HOWTO Install Gentoo on VMware in Windows NT/2K/XP

Key recollections:
- Download Gentoo ISO
- boot from CD in the VMWare machine
- Recompile Kernel (to get the Network/Disk details all worked out)
- Install X Windows
- Install VMWare tools (this was the most work as I recall -- hopefully is has been cleaned up a little more)

As for a 'Should I run gentoo in VMWare'? I would say for sure! Once you are there it is highly useful. At work (a Windows development environment) if I want to use some UNIX tools, I can start up this tiny little VM (relative to my windows) that has a 6GB disk and 256 MB of RAM and it runs just fine, even starting up X Windows and then Eclipse.

Saturday, October 07, 2006

Changing the screen resolution in KDE

There is no good reason why I don't remember this, but going between OSs enough and I confuse myself on the simplest of things. For instance, changing the screen resolution in KDE is much like doing in Windows these days

  1. Right-click on the desktop
  2. Select Configure Desktop
  3. Select the Display Icon in the Left Window
  4. Adjust the screen Size to your hearts content

Friday, October 06, 2006

installing DB2 on Gentoo Linux

There is a well written article on howto do this:
Article Link -Installing DB2 Version 8.2 on Gentoo (2005-01-17)

My only issue I had with this on gentoo was with this command
/opt/IBM/db2/V8.1/instance/db2icrt -u db2fenc1 db2inst1
It was returning
DBI1088E Invalid access permission detected for directory "" IBM article describing the problem/solution

It wasn't really the permissions to the directory given it was a failure the script detected in /usr/bin/pwd

It turns out that the real problem is more in my configuration of gentoo and the /usr/bin/pwd executable. The DB2 installation scripts are peppered with the use of /usr/bin/pwd and doesn't use the built-in pwd in the shell. The problem is that the executable needs to be able to view /.
/ doesn't have read permissions for users in my out of the box installation of gentoo.

To give read access as root Run this command:
chmod a+rx /

The script should run successfully after that.

I've elaborated some further details on a second blog entry

Sunday, October 01, 2006

Linux, Gentoo, Weatherstations and uploading to Wunderground

I am using the Oregon Scientific WMR-968 weather station for monitoring the local weather. I upload the data to wunderground at station id: KWAREDMO10

Key piece of software is Timothy D. Witham's and Jay Denebeim's sourceForge wx200d project.

SourceForge - SourceForge Link
Project Homepage - wx200d Homepage


Steps (as best I can remember them)
(1) Get account at www.wunderground.com - register
(2) Install wx200d
(3) Setup a symlink for the serial port 1 (details below)
a new udev configuration file location: /etc/udev/rules.d/55-udev.rules
add the line: KERNEL=="ttyS0", SYMLINK="wx200"
(4) emerge lib-wwwperl
(5) Configure wx200d, for my case the launching of the daemon needed a '-r' because my station is a WMR-968 - TOUGH!. The README with wx200d is very clear.
The details in my /etc/conf.d/local.start:
if [ -x /usr/local/sbin/wx200d ]; then
echo -n " starting wx200d : "
/usr/local/sbin/wx200d -r
echo
fi
(4) Schedule a cron job to call the wunderground upload utility that came with wx200d. The argument to this utility wunderground is a path to the username/password file
Crontab information:
0-59/5 * * * * /usr/local/sbin/wunderground \
/etc/wunderground/wunderground.conf


Potentially the hardest part of this was learning what udev was all about and how to create a symlink to Serial port 1.

The next step in this process is the generation of a personalized page that I can put up on my domains like http://weather.paulcooley.com. This I've seen done very nicely with Virtual Weather Station. I would like to do this myself and save the cost of the Virtual Weather Station, the demo didn't like my Gentoo linux, X server, etc installation much and was fairly prone to crashing. It worked well in Windows, but my server is definiately linux.


NTP - Network Time Protocol

It is probably just me, but time is important. Having accurate time down to the millisecond is very important. And having you computer's time sync with a near-atomic clock is ideal. Hence NTP.

With Gentoo here is howto - NTP HOWTO

Once setup here are a few command to watch which servers you are connected to, what stratum you are in, and more data about the time than you are generally interested in.

Who are you connected to?
ntpq -c pe

What stratum are you?
ntpq -c rv | grep stratum

More data than necessary.
ntpq -c rv

Gentoo Cron job for backing up your data

Using one of those emerge commmands the other week to rebuild everything after a GCC 4.1.something upgrade, I overwrote a couple of key config files under /etc/... . Ouch, not wise. I made the rash assumption that it was a smart merge of the .config files. Don't do that, it is only as smart as the user :^). The only real loss was in the starting of a daemon for pulling data off of my weather station, but it took awhile to recollect the configuration.

A wiser way to go would be to goto my backups. Not having any didn't help -- it was on the to-do list. I found this to be a simple backup scheme for getting those all important configuration files and other data I might need.

Wikipage for Backupscripts and the cron jobs

I will now not repeat that mistake.

Keywords: Gentoo, Linux, cron job for backups, cron script for backups, simple script for linux backups.

Useful Portage commands (emerge)


Sync up your portage tree with a mirror


emerge --sync
--sync
Initiates a portage tree update with one of the rsync.gentoo.org mirrors. Note that any changes you have made to the portage tree will be erased. Except for special circumstances, this uses rsync to do the update. See make.conf(5)'s description of PORTDIR_OVERLAY for a method to avoid deletions.


Build/install the latest updates in the portage tree.
I use this after 'emerge --sync'


emerge --update --deep world

--update (-u)
Updates packages to the best version available, which may not always be the highest version number due to masking for testing and development. This will also update direct dependencies which may not be what you want. In general, use this option only in combination with the world or system target.


Rebuild Everything
Making deep changes to the compiler toolchain may have lowlevel affects, forcing you do rebuild everything (if you are particularly inclined to play it safe). It could also be that you just like using CPU time ...


emerge -eav system
emerge -eav world

-emptytree (-e)
Reinstalls all world packages and their dependencies to the current USE specifications while differing from the installed set of packages as little as possible. You should run with --pretend first to make sure the result is what you expect.


Search for portage packages
Used to look into the portage tree and find something. It also will tell you if it is install, what version it is, and other useful tidbits.


emerge -s package_name
Example
#emerge -s nut
[snipping the none relevant matches]
* sys-power/nut
Latest version available: 2.0.4-r1
Latest version installed: 2.0.4-r1
Size of files: 683 kB
Homepage: http://www.networkupstools.org/
Description: Network-UPS Tools
License: GPL-2


External References
Rockfloat's tips and tricks also has a good reference

An introduction to Portage: link
A simple portage Wiki page: Portage and Ebuilds
The man page: Portage Man page
The "best-known practices" for working with Portage: HOWTO_Use_Portage_Correctly


Keywords: Gentoo Portage, Gentoo Package Management, Gentoo Portage Commands, Gentoo emerge commands, Gentoo Linux Portage, Useful Portage commands.

Gentoo Linux

Currently I am using Gentoo Linux as my primary Linux machine in my home network.

You can get to the Gentoo homepage via this link.

I've found it is very well documented and easy to use because of portage, the integrated software distrubution system. It is a one-step system to get the latest source, build it, install it for linux. For instance if you want the pine email system, simply type 'emerge pine' and wait for it to complete compiling, once it is complete you can run 'pine'. Simply as 1,2; no 3 even necessary.

In the beginning

there was darkness: In terms of knowledge sharing and documentation.

My intention for this blog is to record the learning and lore of my experiences with Linux; mostly so that I keep my documentation in one location. However, I hope to be able to share my information to others that might find this useful.

To the root of the word lore, see the definition below. I am hoping to aim more for (1) and (2) rather than the definition (3).

Lore dictionary.com link
–noun
1. the body of knowledge, esp. of a traditional, anecdotal, or popular nature, on a particular subject: the lore of herbs.
2. learning, knowledge, or erudition.
3. Archaic.
a. the process or act of teaching; instruction.
b. something that is taught; lesson.

Paul Cooley

Other Sites of interest
http://www.cooley.ca
http://www.paulcooley.com